# 1.Spring Boot 概述
# 1. 什么是 springboot?
- Spring Boot 是基于 Spring 框架开发的全新框架,其设计目的是简化新 Spring 应用的初始化搭建和开发过程。
原有 spring 应用开发非常麻烦,各种组装对象之间依赖关系很麻烦,
- Spring Boot 整合了许多框架和第三方库配置,几乎可以达到 “开箱即用”。
springboot 与其他组件结合非常容易(引入依赖,配置 ,使用)
# 2.Spring Boot 优点?
- 可快速构建独立的 Spring 应用
- 直接嵌入 Tomcat、Jetty 和 Undertow 服务器(无需部署 WAR 文件) 不需要本地安装 tomcat
- 提供依赖启动器简化构建配置
- 极大程度的自动化配置 Spring 和第三方库
- 提供生产就绪功能
- 极少的代码生成和 XML 配置 淘汰 xml
# 2. 使用 springboot 创建工程
1. 创建工程


2. 导入依赖
<!--引入父依赖--> | |
<parent> | |
<groupId>org.springframework.boot</groupId> | |
<artifactId>spring-boot-starter-parent</artifactId> | |
<version>2.1.3.RELEASE</version> | |
<relativePath/> | |
</parent> | |
<dependencies> | |
<!-- web相关依赖 | |
starter-web web启动器 1.完成web相关jar的依赖 2.完成bean(对象)之间的自动装配 | |
--> | |
<dependency> | |
<groupId>org.springframework.boot</groupId> | |
<artifactId>spring-boot-starter-web</artifactId> | |
</dependency> | |
<!-- | |
starter-test springboot单元测试启动器 | |
--> | |
<dependency> | |
<groupId>org.springframework.boot</groupId> | |
<artifactId>spring-boot-starter-test</artifactId> | |
</dependency> | |
</dependencies> |

3. 在根目录下创建一个启动类
根目录:com.qfedu
package com.qfedu;

import org.springframework.boot.SpringApplication;
import org.springframework.boot.autoconfigure.SpringBootApplication;

/**
 * 启动类一般以Application
 * 一个应用只有一个启动类,相当于应用的入口
 */
@SpringBootApplication // 标记当前类是应用的启动类
public class MyApplication {

    public static void main(String[] args) {

        // 启动springboot 应用
        SpringApplication.run(MyApplication.class,args);

    }
}

4. 在 resources 目录中创建静态资源目录 static
静态资源:html css js img mp3
创建 static/ok.html
<!DOCTYPE html>
<html lang="en">
<head>
    <meta charset="UTF-8">
    <title>Title</title>
</head>
<body>

<h1>hello springboot !!</h1>

</body>
</html>

5. 创建一个控制类
package com.qfedu.controller;

import org.springframework.stereotype.Controller;
import org.springframework.web.bind.annotation.RequestMapping;
import org.springframework.web.bind.annotation.RequestMethod;

/**
 * 当前类是一个控制类,内部可以有很多处理器方法
 *
 */
@Controller //1.标记当前类是一个控制类,内部方法可以处理前端请求 2.将当前类创建对象加入到spring容器(map<helloController,对象>)
public class HelloController {


    /**
     * test1方法就是一个处理器方法 相当于 写的servlet中的doGet() doPost()
     *              这样做的原因就是快速的开发,不需要创建很多的Servlet
     *
     *  url:   http://localhost:8080/test1
     * @return
     */
    // @RequestMapping(value = "/test1") 表示当前方法可以处理 /test1的请求,请求方式都支持(get post )
    //  method = RequestMethod.GET 表示当前处理器方法只处理get请求
    @RequestMapping(value = "/test1",method = RequestMethod.GET)
    public String test1(){


        System.out.println("调用 test1 处理器方法");

        // 返回普通的字符串,就是返回静态资源路径 或者jsp 路径
        return "ok.html";
    }


    @RequestMapping(value = "/test2",method = RequestMethod.GET)
    public String test2(){


        System.out.println("调用 test2 处理器方法");

        // 返回普通的字符串,就是返回静态资源路径 或者jsp 路径
        return "ok.html";
    }

}
5. 启动 应用


# 3、Spring
介绍...balabala
spring 的核心功能
- IOC,DI
- AOP
# 3.1 IOC+DI [重点]
# 3.1.0 引言
以前写的 [登录 + 查询全部功能]


# 3.1.1 介绍
IOC 是 Spring 框架的核心功能之一,IOC (inversion of control) 控制反转
控制:控制创建对象的能力
反转:原来创建对象是自己 new, 反转就是将创建对象的能力交给 Spring 容器
由 spring 容器创建对象
创建对象 的注解,以下注解标记在类上,如何告诉 spring 需要创建哪些对象,对象名就是类名首字母小写
- @Controller 在控制层代码上使用
- @Service 在业务层层代码上使用
- @Repository 在数据持久层代码上使用
- @Component 在其他代码上使用
DI (dependency injection) 依赖注入,即 属性赋值,标记在属性中
属性赋值 (依赖注入的注解)
- @Autowired
# 实战(重写登录小例子)
1. 导入依赖
        <!-- mysql驱动 -->
        <dependency>
            <groupId>com.mysql</groupId>
            <artifactId>mysql-connector-j</artifactId>
            <version>8.1.0</version>
        </dependency>
        <!-- DbUtils依赖 -->
        <dependency>
            <groupId>commons-dbutils</groupId>
            <artifactId>commons-dbutils</artifactId>
            <version>1.7</version>
        </dependency>

        <!-- druid 数据库连接池-->
        <dependency>
            <groupId>com.alibaba</groupId>
            <artifactId>druid</artifactId>
            <version>1.1.16</version>
        </dependency>
2. 拷贝以下文件

3. 修改 以下文件


4.AdminController 创建
package com.qfedu.controller;


import com.qfedu.service.AdminService;
import com.qfedu.service.impl.AdminServiceImpl;
import org.springframework.beans.factory.annotation.Autowired;
import org.springframework.boot.autoconfigure.kafka.KafkaProperties;
import org.springframework.stereotype.Controller;
import org.springframework.web.bind.annotation.RequestMapping;

import javax.servlet.http.HttpServletRequest;
import javax.servlet.http.HttpServletResponse;
import java.io.IOException;
import java.io.PrintWriter;
import java.sql.SQLException;

/**
 * AdminController 关于admin 表的业务 (增删改查 ) 登录
 */
@Controller // 标记当前类是控制类,内部的方法可以响应前端请求  ,告诉容器创建对应的对象(bean)
public class AdminController {


    // 这种方式耦合性太强,太low 创建对象的权利交给spring容器
//    private AdminService adminService  = new AdminServiceImpl();

    @Autowired // 从容器中获取一个类型为AdminService的对象,赋值给adminService
    private AdminService adminService;


    /**
     * 登录接口
     *
     *   请求url   : /login?username=xxxx&passwrod=xxxx
     *
     *   HttpServletRequest req, HttpServletResponse resp 是内置参数可以获取请求 和相应相关
     * @return
     */
    @RequestMapping(value = "/login")
    public void login(String username, String password, HttpServletRequest req, HttpServletResponse resp) throws IOException, SQLException {

        // 解决form表单提交请求中文乱码
        req.setCharacterEncoding("utf-8");
        // 解决响应中文乱码 告诉浏览器解析的编码格式
        resp.setContentType("text/html;charset=utf-8");


        System.out.println("username = " + username+"--password=="+password);

        // 使用response 响应前端,此时处理器方法返回值 是void
        PrintWriter printWriter = resp.getWriter();

        // 判断是否登录成功
        boolean result = adminService.login(username, password);
        if (result){ //登录成功响应前端

            //所有的响应都通过 HttpServletResponse resp

            printWriter.println("<html>");
            printWriter.println("<head><title>login</title></head>");
            printWriter.println("<body>");
            printWriter.println("<h1> 登录成功 Success!!!</h1>");
            //out.println("<h1>登录成功!!!</h1>");
            printWriter.println("</body>");
            printWriter.println("</html>");

        }else { // 登录失败

            printWriter.println("<html>");
            printWriter.println("<head><title>login</title></head>");
            printWriter.println("<body>");
            printWriter.println("<h1> 登录失败 Fail!!!</h1>");
            //out.println("<h1>登录成功!!!</h1>");
            printWriter.println("</body>");
            printWriter.println("</html>");
        }


    }


}
5. 测试
http://localhost:8080/login?username=liu&password=123456

# 3.1.3 演示 2
演示 @Component 注解创建对象
1. 声明 Bean
package com.qfedu.entity;

import org.springframework.stereotype.Component;

import java.io.Serializable;

@Component //1.表示告诉容器要创建一个该类型的对象(bean),加入容器
        // 2.默认创建bean的用法,除了controller,service,dao层之外的需要创建bean的注解都使用 @Component
public class Admin implements Serializable {

    private String username = "xiaoming";

    private String password = "123456";

    private  String phone;

    private String address;


    public String getUsername() {
        return username;
    }

    public void setUsername(String username) {
        this.username = username;
    }

    public String getPassword() {
        return password;
    }

    public void setPassword(String password) {
        this.password = password;
    }

    public String getPhone() {
        return phone;
    }

    public void setPhone(String phone) {
        this.phone = phone;
    }

    public String getAddress() {
        return address;
    }

    public void setAddress(String address) {
        this.address = address;
    }

    @Override
    public String toString() {
        return "Admin{" +
                "username='" + username + '\'' +
                ", password='" + password + '\'' +
                ", phone='" + phone + '\'' +
                ", address='" + address + '\'' +
                '}';
    }
}
2.AdminController 引入 Admin 属性
    @Autowired // 从容器中获取一个该类型的bean 注入到当前 属性中
               // 所有使用@Autowired 注解属性使用的前提是:当前类必须创建bean加入到容器 ,只有这样才能从容器中找bean
    private Admin admin;

    /**
     * 获取admin bean
     * @return
     */
    @RequestMapping("/getAdmin")
    public String   getAdmin(){

        System.out.println("admin = " + admin);

        return "ok.html";
    }

# 3.2 AOP
# 3.2.1 介绍
Spring 中另外一个核心功能,AOP
AOP (Aspect Oriented Programming), 即面向切面编程.
OOP (Object Oriented Programming), 即面向对象编程.
切面 就是一个个的横切面


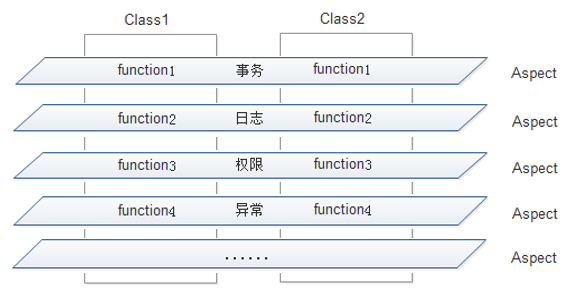

总结:切面就是抽离公共的代码,可以对目标方法进行拦截 过滤 鉴权 记录日志
使用场景
- 事务管理
- 后续 spring 管理事务用的 AOP 原理
- 权限校验
- 后期使用 Spring Security 注解开发时,其实利用了 AOP 思想
- 日志记录
- 性能检测(记录请求时间)
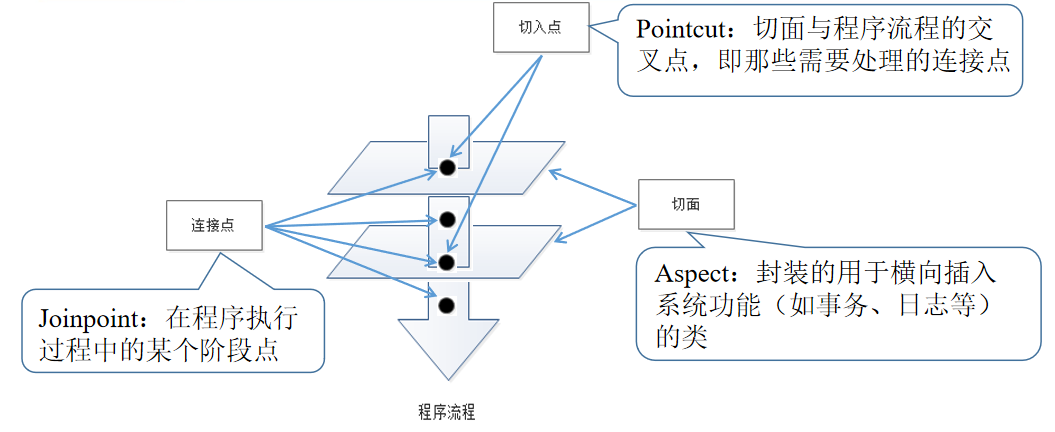
# 3.2.2 AOP 术语
连接点 (Joinpoint):连接点是程序类中客观存在的方法,可被 Spring 拦截并切入内容。即每个方法在切入之前,都是连接点
切入点(Pointcut):被 Spring 切入连接点。即真正会增强的目标方法通知、
增强(Advice):可以为切入点添加额外功能,分为:前置通知、后置通知、异常通知、环绕通知等。
目标对象(Target):被代理的目标对象织入 (Weaving):把通知应用到具体的类,进而创建新的代理类的过程。
代理(Proxy):被 AOP 织入通知后,产生的结代理类。
切面(Aspect):由切点和通知组成
#

概念重新梳理
连接点 (Joinpoint):连接点是程序类中客观存在的方法,可被 Spring 拦截并切入内容。即每个方法在切入之前,都是连接点
连接点 ==== 普通的方法
切入点 (Pointcut):被 Spring 切入连接点。即真正会增强的目标方法
` 切入点 === 被切面切向的普通方法,需要拦截 增强的目标方法
通知、 增强 (Advice):可以为切入点添加额外功能,分为:前置通知、后置通知、异常通知、环绕通知等。
通知 ==== 切面中的方法(抽离公共代码)
目标对象 (Target):被代理的目标对象
需要拦截的哪些方法对应的对象
织入 (Weaving):把通知应用到具体的类,进而创建新的代理类的过程。
将切面切向目标方法的过程就是织入,动作
代理 (Proxy):被 AOP 织入通知后,产生的结代理类。
aop 实现的本质是使用代理模式(静态代理,动态代理)实现
切面 (Aspect):由切点表达式和通知(抽离的公共方法)组成
切面 == 一个类

# 实例
目标:就是创建一个切面,可以拦截过滤我们的 Service 实现类中的方法
1. 引入 aop 相关依赖
       <!-- 导入aop相关 依赖-->
        <dependency>
            <groupId>org.springframework.boot</groupId>
            <artifactId>spring-boot-starter-aop</artifactId>
        </dependency>
2. 创建一个切面
package com.qfedu.aspect;

import org.aspectj.lang.ProceedingJoinPoint;
import org.aspectj.lang.annotation.Around;
import org.aspectj.lang.annotation.Aspect;
import org.aspectj.lang.annotation.Pointcut;
import org.springframework.stereotype.Component;

/**
 * 当前类 就是一个切面,切面中就是抽离的公共方法(通知 )
 */
@Component //将当前类创建bean 加入到spring容器
@Aspect // 声明当前类是一个切面类
public class MyAspect {


    /**
     * 声明此方法为切点表达式
     *   value = "execution( )" 配置切点表达式
     *                             切点:就是要拦截的目标方法  com.qfedu.service.impl.AdminServiceImpl.login(java.lang.String, java.lang.String)
     *                             切点表达式 :就是可以描述一系列的切点
     *
     *  切点表达式公式
     *  public boolean     com.qfedu.service.impl.AdminServiceImpl.login(java.lang.String, java.lang.String)
     *
     *  // 1.去掉 权限修饰符 public
     *  // 2.返回值类型使用 * 替代
     *  // 3.方法名 类名 包名 可以使用*替代
     *     4.参数列表使用 .. 替代
     *   *   com.qfedu.service.*.*.*(..) 切点表达式,表示service包下所有 类中的方法
     *
     */
    @Pointcut(value = "execution( *   com.qfedu.service.*.*.*(..)  )")
    public void pointCut(){

    }

    /**
     * 环绕通知  封装抽离公共的方法 在目标方法执行前后执行
     *
     * ProceedingJoinPoint proceedingJoinPoint  封装了目标对象 及其要执行的方法 参数
     * @param proceedingJoinPoint
     * @return
     */
    @Around(value = "pointCut()") // 标记当前方法为环绕通知 拦截切点表达式中对应的方法
    public Object myAround(ProceedingJoinPoint proceedingJoinPoint) throws Throwable {

        // proceedingJoinPoint.getSignature().getName() 获取即将调用目标方法的名字
        System.out.println("环绕通知-调用目标方法前---目标方法:"+proceedingJoinPoint.getSignature().getName() );

        // 让目标方法(service包下所有 类中的方法)执行 ,result就是对应方法返回值结果
        Object result = proceedingJoinPoint.proceed();

//        Object result = false; 如果不调用proceedingJoinPoint.proceed(); 就是拦截不调用目标对象方法

        System.out.println("目标方法执行 返回的结果 --result = " + result);


        System.out.println("环绕通知-调用目标方法后---目标方法:"+proceedingJoinPoint.getSignature().getName());

         return  result;
    }


}
3. 访问 login 测试
http://localhost:8080/login?username=liu&password=123456


# 3.2.4 Aop 开发步骤
前提引入 aop 依赖
   <!-- 导入aop相关 依赖-->
        <dependency>
            <groupId>org.springframework.boot</groupId>
            <artifactId>spring-boot-starter-aop</artifactId>
        </dependency>
演示各种 aop 增强方式,步骤
创建切面类,类上加注解
- @Component , 加上该注解,springboot 框架就会创建该类对象
- @Aspect , 加上该注解,springboot 框架内部就会知道该类是一个切面类
设置切入点方法,并加注解
- @Pointcut , 用于定义要增强的目标方法路径
设置各种增强 (或者叫通知) 方法
注解 解释 @Around 环绕通知 @Before 前置通知 @After 最终通知 @AfterReturning 后置返回通知 @AfterThrowing 异常通知
package com.qfedu.aspect;

import org.aspectj.lang.JoinPoint;
import org.aspectj.lang.ProceedingJoinPoint;
import org.aspectj.lang.annotation.*;
import org.springframework.stereotype.Component;

/**
 * 当前类 就是一个切面,切面中就是抽离的公共方法(通知 )
 */
@Component //将当前类创建bean 加入到spring容器
@Aspect // 声明当前类是一个切面类
public class MyAspect {


    /**
     * 声明此方法为切点表达式
     *   value = "execution( )" 配置切点表达式
     *                             切点:就是要拦截的目标方法  com.qfedu.service.impl.AdminServiceImpl.login(java.lang.String, java.lang.String)
     *                             切点表达式 :就是可以描述一系列的切点
     *
     *  切点表达式公式
     *  public boolean     com.qfedu.service.impl.AdminServiceImpl.login(java.lang.String, java.lang.String)
     *
     *  // 1.去掉 权限修饰符 public
     *  // 2.返回值类型使用 * 替代
     *  // 3.方法名 类名 包名 可以使用*替代
     *     4.参数列表使用 .. 替代
     *   *   com.qfedu.service.*.*.*(..) 切点表达式,表示service包下所有 类中的方法
     *
     */
    @Pointcut(value = "execution( *   com.qfedu.service.*.*.*(..)  )")
    public void pointCut(){

    }


    /**
     *     @Before(value = "pointCut()")  前置通知 在目标方法调用前执行
     * JoinPoint 标对象 及其要执行的方法 参数  只是不能调用目标方法执行
     * @param joinPoint
     */
    @Before(value = "pointCut()")
    public void myBefore(JoinPoint joinPoint){

        System.out.println("前置通知执行---方法:"+joinPoint.getSignature().getName());

    }


    /**
     * 环绕通知  封装抽离公共的方法 在目标方法执行前后执行
     *
     * ProceedingJoinPoint proceedingJoinPoint  封装了目标对象 及其要执行的方法 参数
     * @param proceedingJoinPoint
     * @return
     */
    @Around(value = "pointCut()") // 标记当前方法为环绕通知 拦截切点表达式中对应的方法
    public Object myAround(ProceedingJoinPoint proceedingJoinPoint) throws Throwable {

        // proceedingJoinPoint.getSignature().getName() 获取即将调用目标方法的名字
        System.out.println("环绕通知-调用目标方法前---目标方法:"+proceedingJoinPoint.getSignature().getName() );

        // 让目标方法(service包下所有 类中的方法)执行 ,result就是对应方法返回值结果
        Object result = proceedingJoinPoint.proceed();

//        Object result = false; 如果不调用proceedingJoinPoint.proceed(); 就是拦截不调用目标对象方法

        System.out.println("目标方法执行 返回的结果 --result = " + result);


        System.out.println("环绕通知-调用目标方法后---目标方法:"+proceedingJoinPoint.getSignature().getName());

         return  result;
    }


    /**
     *  @AfterReturning 后置返回通知  可以得到 目标对象执行的结果
     *      value = "pointCut()" 切点表达式
     *      returning = "result" 需要将目标对象方法执行返回的结果交个那个形参
     * @param joinPoint
     * @param result
     * @return
     */
    @AfterReturning(value = "pointCut()",returning = "result")
    public Object myAfterReturn(JoinPoint joinPoint,Object result){

        System.out.println("后置返回通知执行---方法:"+joinPoint.getSignature().getName() + "--result:"+result);


        return result;
    }


    /**
     *   @After(value = "pointCut()") 后置最终通知
     *
     *          @After 无论目标方法是否正确的执行,都会回调该通知
     *          @AfterReturning  如果目标方法正确的执行,并返回结果  调用后置返回通知
     *                            如果目标方法执行发生异常,无法返回结果,此时 不会调用后置返回通知
     * @param joinPoint
     */
    @After(value = "pointCut()")
    public void myAfter(JoinPoint joinPoint){

        System.out.println("后置最终通知执行---方法:"+joinPoint.getSignature().getName());
    }

    /**
     * @AfterThrowing 后置异常通知  只有目标方法调用有异常时才会 回调
     *       throwing = "e" 可以将目标方法执行抛出的异常,传递给形参 Throwable e
     *
     * @param joinPoint
     * @param e
     */
    @AfterThrowing(value = "pointCut()",throwing = "e")
    public void myAfterThrowing(JoinPoint joinPoint,Throwable e){

        System.out.println("后置异常通知执行---方法:"+joinPoint.getSignature().getName()+"异常信息:"+e.getMessage());

    }


}


# 5.1 MVC
MVC 架构:根据不同的事情由不同的类去处理,内部单一职责
- Model: 模型类,例如封装数据的实体类,业务模型 (Service), 数据层 (Dao)
- View: 视图,展示数据的.HTML,JSP
- Controller: 控制器,控制整个流程走向。决定是否能接收请求,调用哪个业务,跳转哪个页面,Servlet
MVC 架构,就是将我们项目 进行分模块开发,每隔模块都只有一小部分功能,遵循单一职责

# 5.2 请求 & 响应【重点】
@RequestMapping(value = "/testA",method = RequestMethod.GET)
@GetMapping(value = "/testB")
@PostMapping(value = "/testC")
package com.qfedu.controller;


import org.springframework.stereotype.Controller;
import org.springframework.web.bind.annotation.GetMapping;
import org.springframework.web.bind.annotation.PostMapping;
import org.springframework.web.bind.annotation.RequestMapping;
import org.springframework.web.bind.annotation.RequestMethod;

import javax.servlet.http.HttpServletRequest;
import javax.servlet.http.HttpServletResponse;
import java.io.IOException;

@Controller // 表名当前类是控制了 可以接收请求
public class TestController {


    /**
     *  @RequestMapping 默认请情况下可以 get post delete put
     *          method = RequestMethod.GET 表示当前请求方式只支持get
     * @return
     */
    @RequestMapping(value = "/testA",method = RequestMethod.GET)
    public String testA(){
        System.out.println("TestController-testA");
        return "ok.html";

    }

    /**
     *  @GetMapping 只支持Get请求方式
     *  @GetMapping(value = "/testB") ==  @RequestMapping(value = "/testB",method = RequestMethod.GET)
     * @return
     */
    @GetMapping(value = "/testB")
    public String testB(){
        System.out.println("TestController-testB");
        return "ok.html";

    }

    /**
     * @PostMapping(value = "/testC") 表示当前处理器方法只支持post 请求
     * @return
     */
    @PostMapping(value = "/testC")
    public String testC(){
        System.out.println("TestController-testC");
        return "ok.html";

    }

    /**
     * 直接通过response 对象响应前端 处理器方法返回void类型
     *
     * @param request
     * @param response
     * @throws IOException
     */
    @GetMapping(value = "/testD")
    public void testD(HttpServletRequest request, HttpServletResponse response) throws IOException {
        System.out.println("TestController-testD");

        request.setCharacterEncoding("utf-8");
        response.setContentType("text/html;charset=utf-8");

        response.getWriter().println("通过response对象响应前端");

    }


}

# 5.3 参数绑定 【重点】
所谓参数绑定,就是前端发请求中的数据,可以直接在 Controller 的方法参数中接收。即前端请求数据和后端方法参数绑定.
# 5.3.1 简单类型参数绑定 [重点]
简单类型指,常用的几种类型:基本类型 + String+Date
前端界面
<!DOCTYPE html>
<html lang="en">
<head>
    <meta charset="UTF-8">
    <title>Title</title>
</head>
<body>

<h1>addUser1 提交基本类型</h1>

<a href="/addUser1?id=100&username=xiaoming&score=99.5&birthday=2023-08-31">增加用户 </a>
<br>
<!-- 使用表单发起post 请求-->
<form action="/addUser1" method="post" enctype="application/x-www-form-urlencoded">
    id:<input type="number" name="id"><br>
    username:<input type="text" name="username"><br>
    score:<input type="number" name="score"><br>
    birthday:<input type="date" name="birthday"><br>

    <input type="submit" value="添加">
</form>


</body>
</html>
后端接收
package com.qfedu.controller;

import org.springframework.format.annotation.DateTimeFormat;
import org.springframework.stereotype.Controller;
import org.springframework.web.bind.annotation.RequestMapping;

import java.util.Date;

/**
 * user 相关增删改查
 */
@Controller
public class UserController {

    /**
     * 添加用户
     *  接收基本类型  可以直接接收也可以使用其包装类型接收
     *  接收字符串  直接使用String
     *  接收时间字符串  需要  @DateTimeFormat(pattern = "yyyy-MM-dd") Date birthday
     *                 将接收的时间字符串 转化为 java.utils.Date
     *
     *  url /addUser1?id=100&username=xiaoming&score=99.5&birthday=2023-08-31
     * @return
     */
    @RequestMapping("/addUser1")
    public String addUser1(int id, String username, float score,
                           @DateTimeFormat(pattern = "yyyy-MM-dd") Date birthday){

        System.out.println("id = " + id);
        System.out.println("username = " + username);
        System.out.println("score = " + score);
        System.out.println("birthday = " + birthday);

        // 此时如果直接 return路径为jsp html ,再form表单使用post提交时报错误 405 不支持post请求
//        return "ok.html";

        // 此时可以使用重定向解决  redirect:/
        return "redirect:/ok.html";
    }

}
# 5.3.2 对象 [重点]
场景:注册 / 添加 / 更新
如果处理方法接受的参数非常多,此时可以使用 对象 或者 Map 封装起来
前端界面
<h1>addUser2 提交基本类型,使用对象接收</h1>
<a href="/addUser2?id=100&username=xiaoming&score=99.5&birthday=2023-08-31">增加用户 </a>
<br>
<!-- 使用表单发起post 请求-->
<form action="/addUser2" method="post" enctype="application/x-www-form-urlencoded">
    id:<input type="number" name="id"><br>
    username:<input type="text" name="username"><br>
    score:<input type="number" name="score"><br>
    birthday:<input type="date" name="birthday"><br>

    <input type="submit" value="添加">
</form>
处理器方法接收
    /**
     * 接收对象
     * url /addUser2?id=100&username=xiaoming&score=99.5&birthday=2023-08-31
     * 当前处理器方法 接收键值对 =====》java对象user
     * @param user
     * @return
     */
    @RequestMapping("/addUser2")
    public String addUser2(User user){

        System.out.println("user = " + user);

        return "redirect:/ok.html";
    }
# 5.3.5 Map 集合
Map 是键值对,键和值一一映射.
跟 Java 对象很类似,属性和属性值一一对应.
所以什么时候需要 / 可以使用 Map 类型来接收参数呢?
- 凡是可以用对象接收的都可以使用 Map
前端
<h1>addUser3 提交基本类型,使用Map接收</h1>
<a href="/addUser3?id=100&username=xiaoming&score=99.5&birthday=2023-08-31">增加用户 </a>
<br>
<!-- 使用表单发起post 请求-->
<form action="/addUser3" method="post" enctype="application/x-www-form-urlencoded">
    id:<input type="number" name="id"><br>
    username:<input type="text" name="username"><br>
    score:<input type="number" name="score"><br>
    birthday:<input type="date" name="birthday"><br>

    <input type="submit" value="添加">
</form>
后端接收
    /**
     * 使用map 接收键值对
     *   如果参数非常多,但是只使用一次,没有必要创建一个对应的实体类 此时使用map
     *
     * url /addUser3?id=100&username=xiaoming&score=99.5&birthday=2023-08-31
     *
     * Map<String,Object> map 如果直接接收键值对 则获取的null
     * @RequestParam Map<String,Object> map 此时可以将接收键值对 转化为map
     *
     * @param map
     * @return
     */
    @RequestMapping("/addUser3")
    public String addUser3(@RequestParam Map<String,Object> map){

        System.out.println("map = " + map);

        return "redirect:/ok.html";
    }


    /**
     * 此时请求url  /updateUser?userid=100&username=xiaoming&score=99.5&birthday=2023-08-31
     *   前端提交键值对对的key userid=100   而后端接收基本类型int id 此时无法映射成功
     *   此时可以 使用@RequestParam 取别名
     *    @RequestParam(name = "userid") int id 需要从请求的键值对中获取userid对应的值 赋值给id
     * @param id
     * @param username
     * @param score
     * @param birthday
     * @return
     */
    @RequestMapping("/updateUser")
    public String updateUser(@RequestParam(name = "userid") int id, String username, float score,
                             @DateTimeFormat(pattern = "yyyy-MM-dd") Date birthday){

        System.out.println("id = " + id);
        System.out.println("username = " + username);
        System.out.println("score = " + score);
        System.out.println("birthday = " + birthday);
        return "redirect:/ok.html";
    }
# 5.3.6 路径参数 @PathVariable
从路径中获取参数 /user/100 100 就是一个参数
    /**
     *
     * url  /user/100
     *      /user/{id}   {id}占位符,后续使用 @PathVariable获取对应得知
     * @PathVariable(value = "id") int id   需要从url中获取{id}对应位置的值,传递给int id
     * @param id
     * @return
     */
    @GetMapping("/user/{id}")
    public String findUserById(@PathVariable(value = "id") int id){
        System.out.println("id = " + id);

        return "redirect:/ok.html";
    }


# 5.4 页面跳转 [熟悉]
回顾之前学过的 servlet 中跳转页面的功能
- 请求转发:forward
- req.getDispatcherServlet().forward(req,resp)
- 请求路径不变
- 是服务器内部请求
- 一次请求
- 请求域的数据(请求参数,request 的属性)可以共享
- 重定向:redirect
- resp.sendRedirect();
- 请求路径改变
- 是浏览器行为
- 两次请求
- 请求域的不能共享 请求参数,request 的属性丢失
请求转发
以 forward:/路径
 /**
     * 直接通过response 对象响应前端 处理器方法返回void类型
     *
     * @param request
     * @param response
     * @throws IOException
     */
    @GetMapping(value = "/testD")
    public void testD(HttpServletRequest request, HttpServletResponse response) throws IOException {
        System.out.println("TestController-testD");

        request.setCharacterEncoding("utf-8");
        response.setContentType("text/html;charset=utf-8");

        String code = (String) request.getAttribute("code");

        response.getWriter().println("通过response对象响应前端---code:"+code);

    }


    /**
     * 转发 处理方法返回 String 类型 以forward:开头
     *
     *      一般用于:服务器内同类请求(处理器方法 转发到处理器方法)
     *
     * @return
     */
    @RequestMapping("/forwardTest")
    public String forwardTest(HttpServletRequest request){

        System.out.println("转发测试---forwardTest"   );

        // 在request 设置属性,转发到的处理器方法也可以接收到属性
        request.setAttribute("code","8888");

        // 此时转发到 /testD处理器方法
        return "forward:/testD";
    }
重定向
以 redirec:/ 开头
    /**
     * 重定向  返回String 以 redirect:/ 开头      用于控制界面跳转
     *
     *      重定向一般用于服务器内 跳转html 其他前端界面时使用  退出登录
     *                 用于跳转到外部的服务器 连接  http:/www.baidu.com
     * @return
     */
    @RequestMapping("/redirectTest")
    public String redirectTest(HttpServletRequest request){


//        return "redirect:/ok.html";

        // 重定向到内部的处理器方法,此丢失request的属性 参数
        // 在request 设置属性,转发到的处理器方法也可以接收到属性
        request.setAttribute("code","8888");
        return "redirect:/testD";
    }

# 5.5 会话 [重点]
会话:就是 session, 同一个浏览器多个窗口请求同一个服务,多个窗口共享同一个回话 session
如果需要在控制层中使用 session 存储会话数据,比如登录的用户信息,就可以直接在方法的参数列表中定义 HttpSession 对象即可
spring 中的处理器方法 内置参数可以有 HttpServletRequest HttpServletResponse HttpSession, 只要我们在处理器方法声明 ,直接都可以使用
    /**
     * 处理器方法内置参数 可以是  HttpServletRequest request, HttpServletResponse response, HttpSession session
     *  在session存数据
     *  @param request
     * @param response
     * @param session
     */
    @RequestMapping("/testSession1")
    public void testSession1(HttpServletRequest request, HttpServletResponse response,
                             HttpSession session) throws IOException {


        // 向session 中添加属性
        session.setAttribute("loginFlag",true);


        request.setCharacterEncoding("utf-8");
        response.setContentType("text/html;charset=utf-8");
        response.getWriter().println("向session中写入数据 loginFlag");

    }

    /**
     * 从session中读取数据
     * @param response
     * @param session
     * @throws IOException
     */
    @RequestMapping("/testSession2")
    public void  testSession2( HttpServletResponse response,
                               HttpSession session) throws IOException {

        boolean loginFlag = (boolean) session.getAttribute("loginFlag");


        response.setContentType("text/html;charset=utf-8");
        response.getWriter().println("从session中读取数据 loginFlag:"+loginFlag);

    }


# 5.7 json 处理【重点】
# 处理器方法返回值
void 使用 response 相应数据
String 返回 html,jsp 地址 转发重定向
返回 java 对象 ,对象最终转化为 json 字符串
- void 使用 response 相应数据
    @RequestMapping("/testSession1")
    public void testSession1(HttpServletRequest request, HttpServletResponse response,
                             HttpSession session) throws IOException {


        // 向session 中添加属性
        session.setAttribute("loginFlag",true);


        request.setCharacterEncoding("utf-8");
        response.setContentType("text/html;charset=utf-8");
        response.getWriter().println("向session中写入数据 loginFlag");

    }
- String 返回 html,jsp 地址 转发重定向
    /**
     * @PostMapping(value = "/testC") 表示当前处理器方法只支持post 请求
     * @return
     */
    @PostMapping(value = "/testC")
    public String testC(){
        System.out.println("TestController-testC");
        return "ok.html";

    }

    /**
     * 转发 处理方法返回 String 类型 以forward:开头
     *
     *      一般用于:服务器内同类请求(处理器方法 转发到处理器方法)
     *
     * @return
     */
    @RequestMapping("/forwardTest")
    public String forwardTest(HttpServletRequest request){

        System.out.println("转发测试---forwardTest"   );

        // 在request 设置属性,转发到的处理器方法也可以接收到属性
        request.setAttribute("code","8888");

        // 此时转发到 /testD处理器方法
        return "forward:/testD";
    }


    /**
     * 重定向  返回String 以 redirect:/ 开头      用于控制界面跳转
     *
     *      重定向一般用于服务器内 跳转html 其他前端界面时使用  退出登录
     *                 用于跳转到外部的服务器 连接  http:/www.baidu.com
     * @return
     */
    @RequestMapping("/redirectTest")
    public String redirectTest(HttpServletRequest request){


//        return "redirect:/ok.html";

        // 重定向到内部的处理器方法,此丢失request的属性 参数
        // 在request 设置属性,转发到的处理器方法也可以接收到属性
        request.setAttribute("code","8888");
        return "redirect:/testD";
    }
- 返回 java 对象 ,对象最终转化为 json 字符串
# 处理器方法接收参数
内置参数: HttpServletRequest HttpServletResponse HttpSession
前端提交键值对,使用一下方式接收
基本类型+String+Date

接收对象

接收map
- 前端提交 json 字符串,后端使用 java 对象接收
# json
json 就是一种特殊的,具有特定语法的字符串,简单,易读,通常作为,前后端交互的中间数据

# json 对象
json 对象都是键值对,
有{} 包裹,

内部是键值对  ,键值对之间使用,分割

key使用引号标记,value 字符串值使用引号,数值和布尔直接写

类似于js
{
	"id": 100,
	"username": "xiaoming",
	"score": 99,
	"birthday": "2023-09-01"
}

{"id":100,"username":"xiaoming","score":99,"birthday":"2023-09-01"}

json 数组内部就是多个 json 对象
使用中括号包裹
[{
	"id": 100,
	"username": "xiaoming",
	"score": 99,
	"birthday": "2023-09-01"
}, {
	"id": 101,
	"username": "xiaohong",
	"score": 99,
	"birthday": "2023-09-01"
}, {
	"id": 102,
	"username": "lisi",
	"score": 99,
	"birthday": "2023-09-01"
}]

[{"id":100,"username":"xiaoming","score":99,"birthday":"2023-09-01"},{"id":101,"username":"xiaohong","score":99,"birthday":"2023-09-01"},{"id":102,"username":"lisi","score":99,"birthday":"2023-09-01"}]

json 对象嵌套数组
{
	"msg": "ok",
	"status": 1,
	"data": [{
		"id": 100,
		"username": "xiaoming",
		"score": 99,
		"birthday": "2023-09-01"
	}, {
		"id": 101,
		"username": "xiaohong",
		"score": 99,
		"birthday": "2023-09-01"
	}, {
		"id": 102,
		"username": "lisi",
		"score": 99,
		"birthday": "2023-09-01"
	}]

}
json 对象也可以嵌套对象
{
	"msg": "ok",
	"status": 1,
	"data": {
		"id": 100,
		"username": "xiaoming",
		"score": 99,
		"birthday": "2023-09-01"
	}

}
# 处理器方法返回对象转 json @ResponseBody,标记在处理器方法上
User 实体修改
public class User implements Serializable {

    private int id;

    private String username;

    private float score;

    // timezone = "GMT+8" 配置时区
    @JsonFormat(pattern = "yyyy-MM-dd",timezone = "GMT+8") //响应 1.当处理器方法返回对象时,将java.utils.Date 转化为对应的字符串 2023-08-31
                                                           //接收   2.如果前端提交的json字符串 使用java对象接收    字符串2023-08-31 转化为java.utils.Date类型
    @DateTimeFormat(pattern = "yyyy-MM-dd") // 将前端提交的键值对的时间字符串2023-08-31 转化为java.utils.Date类型
    private Date birthday;

    。。。。。。。
    }
    /**
     * url /testJson1?id=100
     * 根据id 查找user
     *
     * 如果处理器方法返回的是 普通的java对象,此时必须在处理器方法加注解@ResponseBody ,
     *                              将返回的对象转化为json 字符串
     * @param id
     * @return
     */
    @ResponseBody // 标记返回的对象 转化为json字符串
    @RequestMapping("/testJson1")
    public User testJson1(int id){

        // 假装去查找user
        User user = new User();
        user.setId(id);
        user.setUsername("xxxx");
        user.setScore(89f);
        user.setBirthday(new Date());

        return user;
    }


    /**
     * 处理器返回map(对象) 转json
     *
     * @return
     */
    @ResponseBody
    @RequestMapping("/testJson2")
    public Map<String,Object> testJson2(){

        HashMap<String ,Object> map = new HashMap<>();
        map.put("id",100);
        map.put("username","xiaoming");

        return map;
    }

    /**
     * 处理方法返回 List集合(对象) 转json
     * @return
     */
    @ResponseBody
    @RequestMapping("/testJson3")
    public List<User>  testJson3(){

        List<User> userList = new ArrayList<>();

        User user1 = new User();
        user1.setId(100);
        user1.setUsername("小明");
        user1.setScore(89f);
        user1.setBirthday(new Date());

        User user2 = new User();
        user2.setId(101);
        user2.setUsername("小红");
        user2.setScore(89f);
        user2.setBirthday(new Date());

        userList.add(user1);
        userList.add(user2);

        return userList;
    }
# 处理器方法接收 json 转 java 对象 使用 @RequesBody,标记在对象参数上
注意!!!!!:只有 post put 请求 可以提交 json 数据,get 请求不可以,因为 get 没有 body 体,无法携带 json 数据
    /**
     * 当前处理器方法 接收post 请求提交的json数据,转化为user对象
     *
     * {
     * 	"id": 100,
     * 	"username": "小明",
     * 	"score": 89.0,
     * 	"birthday": "2023-09-01"
     * }
     *
     *  @RequestBody User user将提交的json 数据转化为User对象
     * @param user
     * @return
     */
    @RequestMapping("/testJson4")
    @ResponseBody // 响应前端json
    public User testJson4( @RequestBody User user){


        System.out.println("user = " + user);

        user.setUsername(user.getUsername() +"testJson4 修改 ");

        return user;
    }

# 5.6 拦截器
拦截器 interceptor 是 spring 框架中的拦截,更为常用
过滤器 Filter 是 Servlet 中的拦截器,更底层一些
以上两个功能一致
使用步骤,与 Servlet 中的过滤器思路基本一致
编写自定义拦截器类
实现接口
重写拦截方法
配置拦截器
- 这个不一样,以前是配置在 web.xml 中或者加上注解 @WebFilter
- 现在 SpringBoot 推荐使用 java 类的方式配置
# 实战
1. 创建拦截器
package com.qfedu.interceptor;

import org.springframework.stereotype.Component;
import org.springframework.web.servlet.HandlerInterceptor;
import org.springframework.web.servlet.ModelAndView;

import javax.servlet.http.HttpServletRequest;
import javax.servlet.http.HttpServletResponse;

/**
 * 拦截器定义步骤
 *    1.实现HandlerInterceptor接口
 *      重写preHandle方法
 *    2.将当前拦截器加入到容器   @Component
 *
 *    3.需要向springboot声明拦截器
 */
@Component
public class MyInterceptor  implements HandlerInterceptor {


    @Override  // 在请求调用处理器方法之前调用
    public boolean preHandle(HttpServletRequest request, HttpServletResponse response, Object handler) throws Exception {

        // request 得到所有请求数据
        // response 可以响应前端

        System.out.println("MyInterceptor ---- preHandle");

        // true表示放行 不拦截
        // false 表示拦截,需要使用response 响应数据
        return true;
    }

    @Override // 在请求调用处理器方法之后调用
    public void postHandle(HttpServletRequest request, HttpServletResponse response, Object handler, ModelAndView modelAndView) throws Exception {

        System.out.println("MyInterceptor ---- postHandle");
    }

    @Override// 在请求完成响应以后 前端调用
    public void afterCompletion(HttpServletRequest request, HttpServletResponse response, Object handler, Exception ex) throws Exception {
        System.out.println("MyInterceptor ---- afterCompletion");
    }
}
2. 声明拦截器
package com.qfedu.interceptor;

import org.springframework.beans.factory.annotation.Autowired;
import org.springframework.context.annotation.Configuration;
import org.springframework.web.servlet.config.annotation.InterceptorRegistry;
import org.springframework.web.servlet.config.annotation.WebMvcConfigurer;

@Configuration // 表名当前类是一个配置类,而且也会加入到容器中
public class MyConfig  implements WebMvcConfigurer {

    @Autowired // 从容器中获取拦截器
    private MyInterceptor myInterceptor;

    @Override // 通过此方法向spring 声明拦截器
    public void addInterceptors(InterceptorRegistry registry) {

        // 加入拦截器
        registry.addInterceptor(myInterceptor)
                .addPathPatterns("/**") //拦截所有的路径
                .excludePathPatterns("/testA"); // 表示不拦截/testA路径
    }
}

3. 测试
http://localhost:8080/testD # 访问的url 不要转发重定向


# 5.9 全局异常处理
SpringBoot 中有一个 ControllerAdvice 的注解,使用该注解表示开启了全局异常的捕获,我们只需在自定义一个方法使用 ExceptionHandler 注解然后定义捕获异常的类型即可对这些捕获的异常进行统一的处理。

# 实战
1. 声明异常处理器
package com.qfedu.exception;


import org.springframework.web.bind.annotation.ControllerAdvice;
import org.springframework.web.bind.annotation.ExceptionHandler;
import org.springframework.web.bind.annotation.ResponseBody;

import java.util.HashMap;
import java.util.Map;

@ControllerAdvice  // 表明名当前类就是一个异常处理器类,可以处理所有请求的异常
public class MyExceptionHandler {

     // 异常处理器
    // @ExceptionHandler(value = Exception.class) 只要异常是Exception异常的子类都可以处理
    @ExceptionHandler(value = Exception.class) // 表明当前方法是一个异常处理器方法
    @ResponseBody // 将Map转化为json 响应前端
    public Map<String,Object> exceptionHandler1(Exception e){

        e.printStackTrace();
        Map<String,Object>  result = new HashMap();

        result.put("code",500);
        result.put("msg","exceptionHandler1-服务器出错了"+e.getMessage());

        return result;
    }

    // @ExceptionHandler 配置的异常处理器越精确,优先级越高
    @ExceptionHandler(value = {ArithmeticException.class})// 表示当前处理器只处理ArithmeticException.class 算数异常
    @ResponseBody
    public Map<String,Object> exceptionHandler2(Exception e){

        e.printStackTrace();
        Map<String,Object>  result = new HashMap();

        result.put("code",500);
        result.put("msg","exceptionHandler2-服务器出错了"+e.getMessage());

        return result;
    }
}
2. 制造异常
    /**
     *  @RequestMapping 默认请情况下可以 get post delete put
     *          method = RequestMethod.GET 表示当前请求方式只支持get
     * @return
     */
    @RequestMapping(value = "/testA",method = RequestMethod.GET)
    public String testA(){
        System.out.println("TestController-testA");

        int i = 1/0; // 我们处理器方法 难免会有报错,所有报错都是Exception子类

        return "ok.html";

    }
3. 测试

# 六、Mybatis
# 6.1 之前的 JDBC 的使用缺点?
- 大量的代码重复
- 手动加载驱动,创建连接 (Connection), 关流
- 封装数据麻烦 (ORM)
- 效率不高 (没有缓存)
# 6.2 Mybatis 的介绍
官网: mybatis – MyBatis 3 | Introduction

# 什么是 MyBatis?
MyBatis 是一款优秀的持久层框架,它支持自定义 SQL、存储过程以及高级映射。MyBatis 免除了几乎所有的 JDBC 代码以及设置参数和获取结果集的工作。MyBatis 可以通过简单的 XML 或注解来配置和映射原始类型、接口和 Java POJO(Plain Old Java Objects,普通老式 Java 对象)为数据库中的记录。
Mybatis 是一个 半ORM框架 ,可以消除 JDBC 的代码和步骤,让开发者 只关注SQL 本身(便于开发者优化 sql)。
ORM 是对象关系映射,是指数据库表和 java 实体类一一对应.

半 ORM 框架:还是需要写 SQL, 由框架帮你完成映射
完全 ORM 框架:连 SQL 都不需要写,只需要遵循 ORM 的要求,就会自动生成 SQL 完成映射 (Hibernate,JPA 等)
注意:Hibernate 基本被淘汰,因为太强大,不需要写 sql,造成 sql 判断过多,效率低下
# 6.3 实战
# 1. 创建工程

# 2. 导入依赖
<!--引入父依赖-->
<parent>
    <groupId>org.springframework.boot</groupId>
    <artifactId>spring-boot-starter-parent</artifactId>
    <version>2.1.3.RELEASE</version>
    <relativePath/>
</parent>

<dependencies>

    <!-- web相关依赖
        starter-web  web启动器 1.完成web相关jar的依赖 2.完成bean(对象)之间的自动装配
  -->
    <dependency>
        <groupId>org.springframework.boot</groupId>
        <artifactId>spring-boot-starter-web</artifactId>
    </dependency>

    <!--
    starter-test  springboot单元测试启动器
    -->
    <dependency>
        <groupId>org.springframework.boot</groupId>
        <artifactId>spring-boot-starter-test</artifactId>
    </dependency>


        <!-- 以下都是mybatis相关依赖-->
    <!-- 小辣椒 懒人神器-->
    <dependency>
        <groupId>org.projectlombok</groupId>
        <artifactId>lombok</artifactId>
        <optional>true</optional>
    </dependency>
    <!-- 阿里巴巴的Druid数据源依赖启动器 -->
    <dependency>
        <groupId>com.alibaba</groupId>
        <artifactId>druid-spring-boot-starter</artifactId>
        <version>1.1.10</version>
    </dependency>

    <!-- MyBatis依赖启动器 -->
    <dependency>
        <groupId>org.mybatis.spring.boot</groupId>
        <artifactId>mybatis-spring-boot-starter</artifactId>
        <version>2.0.0</version>
    </dependency>
    <!-- MySQL数据库连接驱动

       <dependency>
        <groupId>com.mysql</groupId>
        <artifactId>mysql-connector-j</artifactId>
        <version>8.1.0</version>
    </dependency>
    -->
    <dependency>
        <groupId>mysql</groupId>
        <artifactId>mysql-connector-java</artifactId>
    </dependency>


</dependencies>
# 3.lombok
lombok 懒人神器,作用帮助我们自动生成 set get toSring 构造方法
lombok 在 idea 中需要安装插件,idea2021 以后都自带了 lombok,无需安装

package com.qfedu.entity;

import com.fasterxml.jackson.annotation.JsonFormat;
import lombok.*;
import org.springframework.format.annotation.DateTimeFormat;

import java.io.Serializable;
import java.util.Date;

/**
 * @Setter
 * @Getter
 * @ToString
 * 以上三个等价于@Data
 */
@Data  //自动生成 set get toString方法
@AllArgsConstructor// 所有参数构造方法
@NoArgsConstructor // 无惨构造
public class Student  implements Serializable {

    private int id;

    private String name;

    private int  age;

    private String sex;

    private float height;

    //只要遇到时间都加时间转换注解
    @JsonFormat(pattern = "yyyy-MM-dd",timezone = "GMT+8") //响应 1.当处理器方法返回对象时,将java.utils.Date 转化为对应的字符串 2023-08-31
    //接收   2.如果前端提交的json字符串 使用java对象接收    字符串2023-08-31 转化为java.utils.Date类型
    @DateTimeFormat(pattern = "yyyy-MM-dd") // 将前端提交的键值对的时间字符串2023-08-31 转化为java.utils.Date类型
    private Date birthday;


}
测试
package com.qfedu.test;

import com.qfedu.entity.Student;

public class LombokTest {
    public static void main(String[] args) {


        Student student = new Student();

        student.setId(100);
        student.setName("xiaoming");

        System.out.println("student = " + student);

    }
}
# 4. 创建 Dao 接口
package com.qfedu.dao;

import com.qfedu.entity.Student;

import java.util.List;

/**
 * student_tb 相关增删改查
 */
public interface StudentDao {

    /**
     * 查询所有学生
     * @return
     */
    List<Student> findAllStudent();

}
5. 在 resource 创建 mapper/StudentDao.xml 映射文件
StudentDao.xml 作用:就是告诉 mybatis findAllStudent 方法应该执行什么 sql,返回结果封装什么类型对象(映射)
<?xml version="1.0" encoding="UTF-8" ?>
<!DOCTYPE mapper
        PUBLIC "-//mybatis.org//DTD Mapper 3.0//EN"
        "http://mybatis.org/dtd/mybatis-3-mapper.dtd">
<!--
  namespace 称为命名空间,一般是dao的类全限定名
            用于二级缓存隔离数据
  -->
<mapper namespace="com.qfedu.dao.StudentDao">

    <!--
        <select标签 表示内部sql用于查询
             id="findAllStudent" 表示该查询对应哪个方法
              resultType="com.qfedu.entity.Student" 配置的类型是将查询结果的每一行 转化为那种类型的对象

    -->
    <select id="findAllStudent" resultType="com.qfedu.entity.Student">
        SELECT id,name,age,sex,height,birthday from student_tb
    </select>

</mapper>

# 6. 在 resources 创建配置文件 application.properties
# 表示注释
# server.port 配置当前应用端口
server.port=8080

#druid相关配置  修改为自己的
spring.datasource.url=jdbc:mysql://localhost:3306/java2310_1?serverTimezone=Asia/Shanghai&useSSL=false
spring.datasource.username=root
spring.datasource.password=123456

#配置spring-mybatis数据源为druid
spring.datasource.type=com.alibaba.druid.pool.DruidDataSource
#初始化连接池
spring.datasource.druid.initial-size=5
#最大链接数
spring.datasource.druid.max-active=10
#最小链接数
spring.datasource.druid.min-idle=3


#开启驼峰写法
#mybatis.configuration.map-underscore-to-camel-case=true

#如果配置文件  和 类名对应包名可以省略,否则 需要声明位置
mybatis.mapper-locations=classpath:mapper/*.xml

#配置别名
mybatis.type-aliases-package=com.qfedu.entity

#显示mybatis 日志 可以查看mybatis 的日志
logging.level.com.qfedu.dao=debug

# 5 创建启动类
package com.qfedu;

import org.mybatis.spring.annotation.MapperScan;
import org.springframework.boot.SpringApplication;
import org.springframework.boot.autoconfigure.SpringBootApplication;

@MapperScan(value = "com.qfedu.dao") //配置mybatis的包扫描器
@SpringBootApplication
public class MyApplication {

    public static void main(String[] args) {

        SpringApplication.run(MyApplication.class,args);

    }

}
# 6.springboot 单元测试
package com.qfedu;

import com.qfedu.dao.StudentDao;
import com.qfedu.entity.Student;
import org.junit.Test;
import org.junit.runner.RunWith;
import org.springframework.beans.factory.annotation.Autowired;
import org.springframework.boot.test.context.SpringBootTest;
import org.springframework.test.context.junit4.SpringRunner;

import java.util.List;

/**
 * 创建springboot 单元测试类 所在的包必须是springboot启动类所在包,或者子包
 */

@RunWith(SpringRunner.class)
@SpringBootTest   //组合注解,表名当前类是springboot的单元测试
public class StudentDaoTest {

    @Autowired  //从容器中获取StudentDao的实现类
    private StudentDao studentDao;


    /**
     *    @Test 表示当前方法是单元测试方法
     *       方法必须是 public void  而且无参
     */
    @Test
    public void findAllStudentTest(){

        List<Student> allStudent = studentDao.findAllStudent();
        System.out.println("allStudent = " + allStudent);
    }

}
测试

# 7. 使用 StudentController 调用 StudentService StudentDao
StudentService 相关
package com.qfedu.service;

import com.qfedu.entity.Student;

import java.util.List;

public interface StudentService {

    /**
     * 查询所有学生
     * @return
     */
    List<Student> findAllStudent();


}
package com.qfedu.service.impl;

import com.qfedu.dao.StudentDao;
import com.qfedu.entity.Student;
import com.qfedu.service.StudentService;
import org.springframework.beans.factory.annotation.Autowired;
import org.springframework.stereotype.Service;

import java.util.List;

@Service// 加入容器
public class StudentServiceImpl  implements StudentService {

    @Autowired
    private StudentDao studentDao;

    @Override
    public List<Student> findAllStudent() {
        return studentDao.findAllStudent();
    }
}
StudentController 相关
package com.qfedu.controller;

import com.qfedu.entity.Student;
import com.qfedu.service.StudentService;
import org.springframework.beans.factory.annotation.Autowired;
import org.springframework.stereotype.Controller;
import org.springframework.web.bind.annotation.RequestMapping;
import org.springframework.web.bind.annotation.ResponseBody;

import java.util.List;

@Controller
public class StudentController {

    @Autowired //从容器中获取studentService
    private StudentService studentService;


    @ResponseBody
    @RequestMapping("/findAllStudent")
    public List<Student> findAllStudent(){

        // 查询所有学生
        List<Student> allStudent = studentService.findAllStudent();

        return allStudent;

    }

}
测试
http://localhost:8080/findAllStudent

mybatis 跳转插件

# 6.4. 基于 mybatis 实现 curd
# 根据 id 查询学生
接口
    /**
     * 根据id查找学生
     * @param id
     * @return
     */
    Student findStudentById(int id);
映射
    <!--
         id = #{id} 获取findStudentById(int id)方法中参数id对象的值 (仅限于只有一个参数)
         查询结果:  所有的查询都要使用 resultType="com.qfedu.entity.Student"
                          resultMap 配置查询结果的映射
         请求参数:   所有的参数类型都可以不写类型声明 parameterType="int"
    -->
    <select id="findStudentById" resultType="com.qfedu.entity.Student" >
        SELECT id,name,age,sex,height,birthday from student_tb where id = #{id}
    </select>
说明
- parameterType:为传入参数的类型    可以省略不写
- resultType:为输出参数的类型    必须写

- #{id} 为占位符 获取接口中的参数
测试
 /**
     * 根据id查找学生
     */
    @Test
    public void findStudentByIdTest(){
        Student student = studentDao.findStudentById(2);
        System.out.println("student = " + student);
    }
# 增加学生
dao 接口
 /**
     * 增加学生
     * 返回的受影响行数
     * @param student
     * @return
     */
    int  addStudent(Student student);
映射
<!--
        <insert表示要执行插入的sql
            #{name},#{age},#{sex},#{height},#{birthday} 从请求参数 (Student student) student对象属性中获取参数

            插入的返回值:受影响的行数 不需要写 resultType!!!!!
            所有的增删改都不要写  resultType!!!!!
    -->
    <insert id="addStudent" >


        INSERT INTO  student_tb (name,age,sex,height,birthday) VALUES (#{name},#{age},#{sex},#{height},#{birthday} )

    </insert>
测试
  @Test //增加学生
    public void addStudentTest() throws ParseException {

        Student student = new Student();
        student.setName("李四");
        student.setAge(18);
        student.setSex("F");
        student.setHeight(180);

        // 未来可能被淘汰
//        Date birthday = new Date(2003,5,1);

        SimpleDateFormat simpleDateFormat = new SimpleDateFormat("yyyy-MM-dd");
        Date birthday = simpleDateFormat.parse("2003-05-01");

        student.setBirthday(birthday);

        // 返回值收影响行数
        int num = studentDao.addStudent(student);

        if(num > 0){
            System.out.println(" 增加成功num = " + num);
        }

    }
# 修改学生
修改和增加没有任何区别
dao 接口
    /**
     * 更新学生
     * 返回受影响行数
     * @param student
     * @return
     */
    int  updateStudentById(Student student);
映射
    <!--
        <update 表示要执行更新的sql
         返回值是受影响行数 但是不需要写 resultType!!!!!
      -->
    <update id="updateStudentById" >

        UPDATE student_tb set name = #{name} ,age = #{age},sex=#{sex},height = #{height} ,birthday = #{birthday} WHERE id = #{id}

    </update>
测试
    /**
     * 更新学生
     */
    @Test
    public void  updateStudentByIdTest() throws ParseException {

        Student student = new Student();

        student.setId(27);
        student.setName("李老四");
        student.setAge(18);
        student.setSex("F");
        student.setHeight(180);

        SimpleDateFormat simpleDateFormat = new SimpleDateFormat("yyyy-MM-dd");
        Date birthday = simpleDateFormat.parse("2003-05-01");

        student.setBirthday(birthday);

        int num =   studentDao.updateStudentById(student);

        if (num>0){
            System.out.println("更新成功");
        }
    }
# 根据 id 删除学生
dao 接口
   /**
     * 根据id 删除学生
     * @param id
     * @return
     */
    int deleteStudentById(int id);
映射
    <!--
          shift+ ctrl / 注释
          注释尽量不要写在 标签内部

           返回值是受影响行数 但是不需要写 resultType!!!!!
     -->
    <delete id="deleteStudentById">
        delete from student_tb WHERE id = #{id}
    </delete>
测试
    /**
     * 根据id删除学生
     */
    @Test
    public void deleteStudentByIdTest(){

        int num = studentDao.deleteStudentById(27);

        if (num>0){
            System.out.println("删除成功");
        }
    }
# 多参数查询
需求: 通过年龄和性别查询
# mybatis3.4 及以前版本存在多参数找不到问题
        <!-- MyBatis依赖启动器 -->
        <dependency>
            <groupId>org.mybatis.spring.boot</groupId>
            <artifactId>mybatis-spring-boot-starter</artifactId>
            <version>2.0.0</version>
        </dependency>

        <dependency>
            <groupId>org.mybatis</groupId>
            <artifactId>mybatis</artifactId>
            <version>3.4.0</version>
        </dependency>


# 多参数解决方法
1 使用 param1 param2 解决
List<Student> findStudentByAgeAndSex(int age, String sex);
<!--
    多参数查询 findStudentByAgeAndSex(int age,String sex);
-->
<select id="findStudentByAgeAndSex" resultType="com.qfedu.entity.Student">
    SELECT id,name,age,sex,height,birthday from student_tb where age = #{param1} and sex = #{param2}
</select>
2. 使用注解 @Param () 解决
    /**
     * 根据 年龄和性别 查询
     *
     * (@Param("age") int age 解决mybatis 3.4 以前版本直接使用#{age} #{sex} 报错
     *
     *         SELECT id,name,age,sex,height,birthday from student_tb where age = #{age} and sex = #{sex}
     * @param age
     * @param sex
     * @return
     */
     List<Student> findStudentByAgeAndSex(@Param("age") int age, @Param("sex") String sex);
 <!--
        多参数查询 findStudentByAgeAndSex(int age,String sex);
    -->
    <select id="findStudentByAgeAndSex" resultType="com.qfedu.entity.Student">
        SELECT id,name,age,sex,height,birthday from student_tb where age = #{age} and sex = #{sex}
    </select>
3. 使用 map 解决
  /**
     * 根据年龄 和性别 查询
     * @param map
     * @return
     */
    List<Student> findStudentByAgeAndSex2(Map<String,Object> map);
    <!--
      where age = #{age} and sex = #{sex} 获取请求参数 Map<String,Object> map 中的属性
    -->
    <select id="findStudentByAgeAndSex2" resultType="com.qfedu.entity.Student">
        SELECT id,name,age,sex,height,birthday from student_tb where age = #{age} and sex = #{sex}
    </select>
# 如果是 mybatis 3.4 以后的版本(包括 3.5 版本)不存在多参数找不到问题!!!!!!!!!
<!-- MyBatis依赖启动器 -->
        <dependency>
            <groupId>org.mybatis.spring.boot</groupId>
            <artifactId>mybatis-spring-boot-starter</artifactId>
            <version>2.0.0</version>
        </dependency>

可以直接使用 既可
    /**
     * 根据 年龄和性别 查询
     *

     * @param age
     * @param sex
     * @return
     */
     List<Student> findStudentByAgeAndSex(int age,  String sex);
    <!--
        多参数查询 findStudentByAgeAndSex(int age,String sex);
    -->
    <select id="findStudentByAgeAndSex" resultType="com.qfedu.entity.Student">
        SELECT id,name,age,sex,height,birthday from student_tb where age = #{age} and sex = #{sex}
    </select>

# typeAliases 别名
#配置别名 统一为当前包下的实体类取别名 别名为类名 首字母也可以小写
#  com.qfedu.entity.Student   别名  Student  student
mybatis.type-aliases-package=com.qfedu.entity
    <!--
        <select标签 表示内部sql用于查询
             id="findAllStudent" 表示该查询对应哪个方法
              resultType="com.qfedu.entity.Student" 配置的类型是将查询结果的每一行 转化为那种类型的对象

         resultType="Student" 使用别名配置需要转换的类型
         resultType="student"
    -->
    <select id="findAllStudent" resultType="student">
        SELECT id,name,age,sex,height,birthday from student_tb
    </select>
# 查询的结果集,一般都要使用实体类接收,其实也可以使用 Map 接收
适用于查询结果和实体类不照应情况

dao 接口
 /**
     * 查询 性别 对应的平均身高  年龄
     * @return
     */
    List<Map> getAvgAgeAndHeightBySex();
映射
    <!--
        resultType="map" 将查询的结果集使用map接收
    -->
    <select id="getAvgAgeAndHeightBySex" resultType="map">

        SELECT  sex,AVG(height) avg_height ,AVG(age) avg_age FROM student_tb GROUP BY sex;
    </select>
测试
    /**
     * 根据性别查询平局年龄 身高
     */
    @Test
    public void  getAvgAgeAndHeightBySexTest(){

        List<Map> mapList = studentDao.getAvgAgeAndHeightBySex();

        for (Map map : mapList) {
            System.out.println("map = " + map);
        }

    }
# 6.5 ORM 映射
# 6.5.1 MyBatis 自动 ORM 失效

# 开启驼峰映射
在配置文件开启驼峰映射
#开启驼峰写法
# 如果查询结果集 列名自动转换为驼峰  student_info ===> studentInfo 此时可以自动映射属性
mybatis.configuration.map-underscore-to-camel-case=true
直接使用
    <!--
        解决列名映射 不一致问题:
                1.使用驼峰 自动映射
    -->
    <select id="findAllStudent" resultType="student">
        SELECT id,name,age,sex,height,birthday,student_info from student_tb
    </select>
# 列的别名
在 SQL 中使用 as 为查询字段添加列别名,以匹配属性名。
    <!--
        解决列名映射 不一致问题:
                1.使用驼峰 自动映射
                2.使用列的别名   student_info as studentInfo
    -->
    <select id="findAllStudent" resultType="student">
        SELECT id,name,age,sex,height,birthday,student_info as studentInfo from student_tb
    </select>

# 结果映射(ResultMap - 查询结果的封装规则)
通过 <resultMap id=""type=""> 映射,匹配列名与属性名。
dao 接口
 /**
     * 查询所有学生
     * @return
     */
    List<Student> findAllStudent2();
映射
    <!--
        <resultMap 声明一个自定义映射 可以将查询结果集的列名  和 实体属性名 进行手动一一映射,还可以解决一对一 一对多问题

             <id column="id" property="id"></id>  <id 对应表的主键列 将表中主键id列 映射到实体类属性id
                            column="id" 查询结果集的列名
                             property="id" java实体类属性id
              <result column="name" property="name"></result> <result 指定普通列的映射
                            column="name"       查询结果集的列名
                             property="name"    java实体类属性name
    -->
    <resultMap id="studentMap1" type="com.qfedu.entity.Student">

        <!-- 如果 结果集的列和 属性名一致,也可以省略-->
        <id column="id" property="id"></id>
        <result column="name" property="name"></result>
        <result column="age" property="age"></result>
        <result column="sex" property="sex"></result>
        <result column="height" property="height"></result>
        <result column="birthday" property="birthday"></result>

        <!-- 此时完成 查询结果集列名student_info  和实体类studentInfo 映射  -->
        <result column="student_info" property="studentInfo"></result>

    </resultMap>

    <!--
        resultMap="studentMap1" 使用自定义的resultMap进行 映射
    -->
    <select id="findAllStudent2" resultMap="studentMap1">
        SELECT id,name,age,sex,height,birthday,student_info  from student_tb
    </select>
测试
    /**
     *    @Test 表示当前方法是单元测试方法
     *       方法必须是 public void  而且无参
     */
    @Test
    public void findAllStudent2Test(){

        List<Student> allStudent = studentDao.findAllStudent2();
        System.out.println("allStudent = " + allStudent);
    }
# 6.6mybatis 多表查询
mybatis 将多张表关联的查询结果,映射到 java 的实体类中

# 多表查询分为两种
- 一对一
一个成绩归属于一个学生
SELECT a.id,a.course,a.score,a.student_id,b.id sid , b.name,b.sex,b.age,b.height,b.birthday,b.student_info
		FROM score_tb a LEFT JOIN student_tb b on a.student_id = b.id;


- 一对多
一个学生可以有多个成绩
SELECT a.id,a.name, a.sex,a.age,a.height,a.birthday,a.student_info,
	     b.id sid,b.course,b.score,b.student_id
	FROM student_tb a LEFT JOIN score_tb b on a.id = b.student_id


# 一对一实战

1. 创建实体类
package com.qfedu.entity;

import lombok.AllArgsConstructor;
import lombok.Data;
import lombok.NoArgsConstructor;

import java.io.Serializable;

@Data
@AllArgsConstructor
@NoArgsConstructor
public class Score  implements Serializable {

    private int id;

    private String course;

    private float score;

    private int studentId;

    private Student student;

}
2.ScoreDao 接口
package com.qfedu.dao;

import com.qfedu.entity.Score;

import java.util.List;

public interface ScoreDao {


    /**
     * 一对一查询
     *      查询所有成绩 并包含归属的学生信息
     * @return
     */
    List<Score> findAllScoreWithStudent();

}
3. 对应的映射
<?xml version="1.0" encoding="UTF-8" ?>
<!DOCTYPE mapper
        PUBLIC "-//mybatis.org//DTD Mapper 3.0//EN"
        "http://mybatis.org/dtd/mybatis-3-mapper.dtd">
<mapper namespace="com.qfedu.dao.ScoreDao">


    <resultMap id="scoreMap1" type="com.qfedu.entity.Score">
        <!-- 左表的映射-->
        <id column="id" property="id"></id>
        <result column="course" property="course"></result>
        <result column="score" property="score"></result>
        <result column="student_id" property="studentId"></result>
        <!--
            右表映射
                 <association 完成一对一的右表映射
                 property="student" 要设置到Score中的属性
                  column="student_id" 对应左表和右表关联的左边关联的列
                   javaType="com.qfedu.entity.Student" 将查询的右表转化为一个对象
        -->
        <association property="student" column="student_id" javaType="com.qfedu.entity.Student">
                <id column="student_id" property="id"></id>
                <result column="name" property="name"></result>
                <result column="sex" property="sex"></result>
                <result column="age" property="age"></result>
                <result column="height" property="height"></result>
                <result column="birthday" property="birthday"></result>
                <result column="student_info" property="studentInfo"></result>

        </association>

    </resultMap>

    <!-- 一对一查询
          使用resultMap 完成查询结果的映射
    -->
    <select id="findAllScoreWithStudent" resultMap="scoreMap1">

        SELECT a.id,a.course,a.score,a.student_id,b.id sid , b.name,b.sex,b.age,b.height,b.birthday,b.student_info
        FROM score_tb a LEFT JOIN student_tb b on a.student_id = b.id;

    </select>

</mapper>
4 测试
package com.qfedu;

import com.qfedu.dao.ScoreDao;
import com.qfedu.entity.Score;
import lombok.AllArgsConstructor;
import org.junit.Test;
import org.junit.runner.RunWith;
import org.springframework.beans.factory.annotation.Autowired;
import org.springframework.boot.test.context.SpringBootTest;
import org.springframework.test.context.junit4.SpringRunner;

import java.util.List;

@RunWith(SpringRunner.class)
@SpringBootTest
public class MybatisTest {


    @Autowired
    private ScoreDao scoreDao;


    /**
     * 一对一映射
     */
    @Test
    public void findAllScoreWithStudentTest(){


        List<Score> allScoreWithStudent = scoreDao.findAllScoreWithStudent();

        for (Score score : allScoreWithStudent) {
            System.out.println("score = " + score);
        }

    }


}

# 一对多实战

1. 在 Student 实体类增加属性
package com.qfedu.entity;

import com.fasterxml.jackson.annotation.JsonFormat;
import lombok.AllArgsConstructor;
import lombok.Data;
import lombok.NoArgsConstructor;
import org.springframework.format.annotation.DateTimeFormat;

import java.io.Serializable;
import java.util.Date;
import java.util.List;

/**
 * @Setter
 * @Getter
 * @ToString
 * 以上三个等价于@Data
 */
@Data  //自动生成 set get toString方法
@AllArgsConstructor// 所有参数构造方法
@NoArgsConstructor // 无惨构造
public class Student implements Serializable {

    private int id;

    private String name;

    private int  age;

    private String sex;

    private float height;

    //只要遇到时间都加时间转换注解
    @JsonFormat(pattern = "yyyy-MM-dd",timezone = "GMT+8") //响应 1.当处理器方法返回对象时,将java.utils.Date 转化为对应的字符串 2023-08-31
    //接收   2.如果前端提交的json字符串 使用java对象接收    字符串2023-08-31 转化为java.utils.Date类型
    @DateTimeFormat(pattern = "yyyy-MM-dd") // 将前端提交的键值对的时间字符串2023-08-31 转化为java.utils.Date类型
    private Date birthday;

    // 此时 studentInfo和 数据表中的字段不一致
    private  String studentInfo;


    private  List<Score> scoreList;


}
2.StudentDao
package com.qfedu.dao;

import com.qfedu.entity.Student;

import java.util.List;

public interface StudentDao {

    /**
     * 查询所有学生 并包含对应的成绩
     * @return
     */
    List<Student> findAllStudentWithScore();

}
3. 映射 StudentDao.xml
<?xml version="1.0" encoding="UTF-8" ?>
<!DOCTYPE mapper
        PUBLIC "-//mybatis.org//DTD Mapper 3.0//EN"
        "http://mybatis.org/dtd/mybatis-3-mapper.dtd">
<mapper namespace="com.qfedu.dao.StudentDao">


    <resultMap id="studentMap1" type="com.qfedu.entity.Student">
        <!-- 配置左表 学生表-->
        <id column="id" property="id"></id>
        <result column="name" property="name"></result>
        <result column="sex" property="sex"></result>
        <result column="age" property="age"></result>
        <result column="height" property="height"></result>
        <result column="birthday" property="birthday"></result>
        <result column="student_info" property="studentInfo"></result>

        <!--  映射右表
            collection 配置一对多的右表,将多行右表中的结果转化为集合
                property="scoreList" 对应Student属性的成绩集合
                column="id" 左表关联的列
                ofType="com.qfedu.entity.Score" 表示同一个学生对应的每一个成绩转化为一个Score对象 放置到list集合中


        -->
        <collection property="scoreList" column="id" ofType="com.qfedu.entity.Score" >
            <id column="sid" property="id"></id>
            <result column="course" property="course"></result>
            <result column="score" property="score"></result>
            <!--  一对多  关联的列 尽量使用右表的值  -->
            <result column="student_id"   property="studentId"></result>
        </collection>

    </resultMap>

    <select id="findAllStudentWithScore" resultMap="studentMap1">
        SELECT a.id,a.name, a.sex,a.age,a.height,a.birthday,a.student_info,
               b.id sid,b.course,b.score,b.student_id
        FROM student_tb a LEFT JOIN score_tb b on a.id = b.student_id
    </select>


</mapper>
4. 测试
   @Autowired
    private StudentDao studentDao;


    /**
     * 一对多查询
     */
    @Test
    public void  findAllStudentWithScoreTest(){

        List<Student> allStudentWithScore = studentDao.findAllStudentWithScore();

        for (Student student : allStudentWithScore) {
            System.out.println("student = " + student);
        }
    }

# 多对多

查询所有的角色并包含对应的学生 列表
左表是角色 右表,学生角色中间表 学生表
SELECT * from role_tb

SELECT * from role_tb  r LEFT JOIN  student_role_tb sr on r.roleid=
		sr.roleid

SELECT r.*,s.* from role_tb  r
		LEFT JOIN  student_role_tb sr on r.roleid=sr.roleid
    LEFT JOIN  student_tb s  on  sr.studentid = s.id

1. 创建 Role 实体类
package com.qfedu.entity;

import lombok.AllArgsConstructor;
import lombok.Data;
import lombok.NoArgsConstructor;

import java.io.Serializable;
import java.util.List;

@Data
@AllArgsConstructor
@NoArgsConstructor
public class Role implements Serializable {

    private int roleId;

    private String roleName;

    private List<Student> studentList;

}
2.RoleDao
package com.qfedu.dao;

import com.qfedu.entity.Role;

import java.util.List;

public interface RoleDao {

    /**
     * 多对多中的一对多
     * 查询所有角色 包含对应成绩
     * @return
     */
  List<Role> findAllRoleWithStudent();

}
3.RoleDao.xml
<?xml version="1.0" encoding="UTF-8" ?>
<!DOCTYPE mapper
        PUBLIC "-//mybatis.org//DTD Mapper 3.0//EN"
        "http://mybatis.org/dtd/mybatis-3-mapper.dtd">
<mapper namespace="com.qfedu.dao.RoleDao">


    <resultMap id="roleMap1" type="com.qfedu.entity.Role">
        <!-- 左表映射-->
        <id column="roleid" property="roleId"></id>
        <result column="rolename" property="roleName"></result>

        <!-- 右表映射
              column="roleid" 对应左表的关联列
        -->
        <collection property="studentList" column="roleid" ofType="com.qfedu.entity.Student">
            <id column="id" property="id"></id>
            <result column="name" property="name"></result>
            <result column="sex" property="sex"></result>
            <result column="age" property="age"></result>
            <result column="height" property="height"></result>
            <result column="birthday" property="birthday"></result>
            <result column="student_info" property="studentInfo"></result>
        </collection>
    </resultMap>

    <select id="findAllRoleWithStudent" resultMap="roleMap1">

        SELECT r.*,s.* from role_tb  r
                                LEFT JOIN  student_role_tb sr on r.roleid=sr.roleid
                                LEFT JOIN  student_tb s  on  sr.studentid = s.id
    </select>

</mapper>
4. 测试
 @Autowired
    private RoleDao roleDao;

    /**
     * 多对多测试
     */
    @Test
    public void findAllRoleWithStudentTest(){

        List<Role> allRoleWithStudent = roleDao.findAllRoleWithStudent();

        for (Role role : allRoleWithStudent) {
            System.out.println("role = " + role);
        }

    }

# 6.7Mybatis 的动态 SQL 语句
# 6.7.1 动态 sql 语句 <if>
在后台管理系统中,经常遇到多条件查询
1. 查询所有学生
SELECT id,name,age,sex,height,birthday,student_info as studentInfo from student_tb
2. 按照性别查询所有学生
 SELECT id,name,age,sex,height,birthday,student_info as studentInfo from student_tb where
 sex = #{sex}
3. 按照姓名模糊查询学生
 SELECT id,name,age,sex,height,birthday,student_info as studentInfo from student_tb where
 name like #{name}
4. 按照性别 姓名查询学生
 SELECT id,name,age,sex,height,birthday,student_info as studentInfo from student_tb where
 name like #{name}  and sex = #{sex}
以上查询我们可以在一个 sql 中完成,通过动态 sql <if> 标签进项 sql 的动态拼接
 SELECT id,name,age,sex,height,birthday,student_info as studentInfo
			from student_tb WHERE  1=1
					AND sex = 'F'
          AND name like '%洋%'
# 实战
1.StudentDao 增加
   /**
     * 按照条件查询所有学生
     *  Student student 封装查询条件
     * @param student
     * @return
     */
    List<Student> findStudentByCondition(Student student);
2. 对应映射
    <!--按照条件查询
          <if test="name !=null and name!=''">  动态sql
                            测试参数name不为null 不等于空  如果条件成立,拼接内部sql
                                    AND name like #{name}
    -->
    <select id="findStudentByCondition" resultType="com.qfedu.entity.Student">
        SELECT id,name,age,sex,height,birthday,student_info as studentInfo
                from student_tb WHERE  1=1
         <if test="name !=null and name!=''">
             AND name like #{name}
         </if>
        <if test="sex !=null and sex!=''">
            AND sex = #{sex}
        </if>


    </select>
3 测试
    /**
     * 多条件查询学生
     *  动态sql <if
     */
    @Test
    public void  findStudentByConditionTest(){

        Student student = new Student();

        // 如果student的属性都为null  执行:SELECT id,name,age,sex,height,birthday,student_info as studentInfo from student_tb WHERE 1=1

        student.setName("%洋%"); // 此时执行sql  SELECT id,name,age,sex,height,birthday,student_info as studentInfo from student_tb WHERE 1=1 AND name like ?

        student.setSex("F"); // 此时执行sql  SELECT id,name,age,sex,height,birthday,student_info as studentInfo from student_tb WHERE 1=1 AND name like ? AND sex = ?

        List<Student> studentList = studentDao.findStudentByCondition(student);
        System.out.println("studentList = " + studentList);

    }

# 6.7.2 动态 sql 语句 <where> </where>
<where> </where > 可以替代 sql 语句中的 where 1=1
<!--按照条件查询
          <if test="name !=null and name!=''">  动态sql
                            测试参数name不为null 不等于空  如果条件成立,拼接内部sql
                                    AND name like #{name}

             <where> 本质: 1.等价于 where   1=1
                           2.自动将第一个and 去掉
    -->
    <select id="findStudentByCondition" resultType="com.qfedu.entity.Student">
        SELECT id,name,age,sex,height,birthday,student_info as studentInfo
                from student_tb
                <where>
                    <if test="name !=null and name!=''">
                        AND name like #{name}
                    </if>
                    <if test="sex !=null and sex!=''">
                        AND sex = #{sex}
                    </if>
                </where>


    </select>

# 6.7.3 动态语句 <foreach> </foreach>
<foreach> 标签是为解决 mybatis 接受集合参数设置的。适用场景如下
# 根据id列表查询
 SELECT id,name,age,sex,height,birthday,student_info as studentInfo
			from student_tb WHERE id in (1,3,5,7,9)
1. 创建接口
    /**
     * 根据id列表 查询学生
     * @Param("ids") List<Integer> ids 使用@Param("ids")  解决动态sql 无法获取问题
     * @param ids
     * @return
     */
    List<Student> findStudentByIds(@Param("ids") List<Integer> ids);
2 映射
    <!--
        # 根据id列表查询
 SELECT id,name,age,sex,height,birthday,student_info as studentInfo
			from student_tb WHERE id in (1,3,5,7,9)\

	      <foreach collection="ids" item="id">
	            collection="ids"  遍历集合的参数名
	            item="id" 遍历集合中的每一个赋值给id
	             open="and id in (" 拼接的开头
	             close=")" 拼接的结尾
	             separator="," 每隔元素的分割
	                    #{id} 获取赋值的id变量

    -->
    <select id="findStudentByIds" resultType="com.qfedu.entity.Student">
        SELECT id,name,age,sex,height,birthday,student_info as studentInfo from student_tb
        <where>

            <if test="ids !=null and ids.size()>0">

                    <foreach collection="ids" item="id" open="and id in (" close=")" separator=",">
                            #{id}
                    </foreach>

            </if>

        </where>

    </select>

3. 测试
    /**
     * 根据id 列表查询
     * 动态sql <foreach></foreach>
     */
    @Test
    public void findStudentByIdsTest(){

        List<Integer> ids = new ArrayList<>();

        ids.add(1);
        ids.add(3);
        ids.add(5);
        ids.add(7);
        ids.add(9);

        // 执行sql  SELECT id,name,age,sex,height,birthday,student_info as studentInfo from student_tb WHERE id in ( ? , ? , ? , ? , ? )

        List<Student> studentList = studentDao.findStudentByIds(ids);
        System.out.println("studentList = " + studentList);
    }

# 6.7.4 动态语句 <sql> </sql>
在 xml 配置我们可以通过 <sql> 完成语句的声明,通过 < include> 标签进行应用拼接
<sql> 抽离公共的 sql
<include> 引用公共的 sql
<!--
        声明一个公共的sql id="student_select_sql1"
    -->
    <sql id="student_select_sql1">
        SELECT id,name,age,sex,height,birthday,student_info as studentInfo from student_tb
    </sql>

    <!--
        # 根据id列表查询
 SELECT id,name,age,sex,height,birthday,student_info as studentInfo
			from student_tb WHERE id in (1,3,5,7,9)\

	      <foreach collection="ids" item="id">
	            collection="ids"  遍历集合的参数名
	            item="id" 遍历集合中的每一个赋值给id
	             open="and id in (" 拼接的开头
	             close=")" 拼接的结尾
	             separator="," 每隔元素的分割
	                    #{id} 获取赋值的id变量

          <include refid="student_select_sql1"></include> 引用公共的sql
    -->
    <select id="findStudentByIds" resultType="com.qfedu.entity.Student">
        <include refid="student_select_sql1"></include>
        <where>

            <if test="ids !=null and ids.size()>0">

                    <foreach collection="ids" item="id" open="and id in (" close=")" separator=",">
                            #{id}
                    </foreach>

            </if>

        </where>

    </select>
# 6.8 事务
事务:保证多条 sql 执行时,要么都成功,要么有一条失败,成功的要回滚
jdbc 开启事务
1.开启事务 /关闭自动提交
2.执行sql 一系列sql
3.提交事务
	如果有异常需要回滚


以上事务的完成都是基于connection 链接

完成事务的本质是 :多条sql都在同一个connection 链接中执行并提交事务
事务四大特性:
原子性::保证多条 sql 执行时,要么都成功,要么有一条失败,成功的要回滚
不可再分
一致性: 事务执行前后,整体一致
以转账为例 转账前后总金额没有变化
隔离性: 多个 sqlSession 之间互补影响
一个事务不可以不去读取到另一个事务未提交数据
持久性: 掉电不丢失,重启之后数据还在
mybatis 开启事务
   /**
     * 测试事务
     *  一次性删除两条数据,保证数据一致性
     *  @Transactional 标记在方法上,一般是在service层的方法 开启事务
     *                  本质:该方法调用的所有的dao方法 执行都使用同一个sqlSession(连接) 提交事务 回滚事务
     */
    @Test
    @Transactional
    public void deleteStudentByIdsTest(){

        int num1 = studentDao.deleteStudentById(3);

        // 故意抛出异常
        int i = 1/0;

        int num2 = studentDao.deleteStudentById(5);


        System.out.println("num1 = " + num1);
        System.out.println("num2 = " + num2);

    }
一般来说在 Service 层开启事务
package com.qfedu.controller;

import com.qfedu.service.StudentService;
import org.springframework.beans.factory.annotation.Autowired;
import org.springframework.stereotype.Controller;
import org.springframework.test.context.ActiveProfiles;
import org.springframework.web.bind.annotation.RequestMapping;

import java.util.HashMap;
import java.util.Map;

@Controller
public class StudentController {


    @Autowired
    private StudentService studentService;

    @RequestMapping("/deleteStudentByIds")
    public Map<String,Object> deleteStudentByIds(int id1, int id2){


        studentService.deleteStudentByIds(id1, id2);

        Map<String,Object> map = new HashMap<>();

        map.put("code",1);
        map.put("msg","ok");

        return map;

    }


}
package com.qfedu.service.impl;

import com.qfedu.dao.StudentDao;
import com.qfedu.service.StudentService;
import org.springframework.beans.factory.annotation.Autowired;
import org.springframework.stereotype.Service;
import org.springframework.transaction.annotation.Transactional;

@Service
public class StudentServiceImpl  implements StudentService {

    @Autowired
    private StudentDao studentDao;

    @Transactional //开启事务  一般都在service层
    @Override
    public void deleteStudentByIds(int id1, int id2) {

        int num1 = studentDao.deleteStudentById(id1);

        // 故意抛出异常
        int i = 1/0;

        int num2 = studentDao.deleteStudentById(id2);


    }
}
# 6.8 缓存 (cache)【面试】
前提:mybatis 只要使用一级 二级缓存,对应映射的实体类都要实现序列化

缓存主要目的是为了
提高查询效率。缓存其实就是一个内存空间,存储在程序的某个地方,存储数据.mybatis 支持缓存的,且有两级缓存
- 一级缓存
- 二级缓存
| 无缓存:用户在访问相同数据时,需要发起多次对数据库的直接访问,导致产生大量 IO、读写硬盘的操作,效率低下 |
|---|
 |
| 有缓存:首次访问时,查询数据库,将数据存储到缓存中;再次访问时,直接访问缓存,减少 IO、硬盘读写次数、提高效率 |
| ------------------------------------------------------------ |
 |

# 6.8.1 一级缓存
MyBatis 的
一级缓存是默认的。无需配置,自动实现.默认的
一级缓存是SqlSession(链接)级别,是指同一个 SqlSession 发起的多次查询同一条数据,会使用缓存.

ps: Mybatis 内部存储缓存使用的是一个 HashMap 对象,key 为 hashCode + sqlId + sql 语句。而 value 值就是从查询出来映射生成的 java 对象。
# 实战
    /**
     * 测试一级缓存
     *      一级缓存基于sqlSession存储
     *      只要 发生增删改 缓存清空  避免数据出现混乱,缓存数据和数据库数据不一致问题
     */
    @Transactional // 只有开启事务才能让多个sql 共享同一个sqlSession ,共享一级缓存
    @Test
    public void  cacheTest1(){

        System.out.println("第一次查询");
        Student student1 = studentDao.findStudentById(3);
        System.out.println("student1="+student1);

        System.out.println("第二次查询");
        Student student2 = studentDao.findStudentById(3);
        System.out.println("student2="+student2);

        System.out.println("执行 删除操作清除缓存");
        int num = studentDao.deleteStudentById(1000);
        System.out.println("num = " + num);


        System.out.println("第三次查询");
        Student student3 = studentDao.findStudentById(3);
        System.out.println("student3="+student3);


    }


# 6.8.2 二级缓存
二级缓存是Mapper级别,比 SqlSession 级别范围更大.
需要在 mapper 中设置 caceh 即可
<cache/>
- 映射语句文件中的所有 select 语句的结果将会被缓存。
- 映射语句文件中的所有 insert、update 和 delete 语句会刷新缓存。
# 实战
1. 开启二级缓存
<!-- 开启二级缓存
         type="" 用于自定义二级缓存
         size="1000"表示当前mapper(命名空间下)最多存储 1000条数据
          flushInterval="60000"  配置缓存有效期 没个60s 都会自动清空缓存一次
                                   尽可能保证数据的新鲜 保证一致性
           eviction="FIFO"  缓存满了以后 淘汰策略
                            FIFO 最先缓存 最先删除
                            LRU 最近最少使用原则

    -->
    <cache size="1000" flushInterval="60000" eviction="LRU" ></cache>
2. 配置实体类映射序列化

3. 测试二级缓存


/**
 * 测试二级缓存
 *    二级缓存是基于mapper(namespace)的,多个sqlSession 也可以从二级缓存获取数据
 */
@Test
public void cacheTest2(){

    // 1.查询   并且提交二级缓存(事务提交)
    System.out.println("----第一次查询");
    startTransaction();

    System.out.println("----第二次查询");
    Student student2 = studentDao.findStudentById(3);
    System.out.println("student2 = " + student2);


    System.out.println("发生增删改清空 一级缓存,二级缓存");
    studentDao.deleteStudentById(1000);

    System.out.println("----第三次查询");
    Student student3 = studentDao.findStudentById(3);
    System.out.println("student3 = " + student3);


}


/*
        开启事务,方法结束,提交事务(将查询结果提交二级缓存)
 */
@Transactional
public void startTransaction(){
    Student student1 =   studentDao.findStudentById(3);
    System.out.println("student1 = " + student1);
}
# 6.8.3mybatis 一级缓存 二级缓存优先级
一级缓存 :基于 sqlSession
二级缓存:基于 mapper (namespace) 多个 sqlSession 可以从二级缓存获取数据
结论:二级缓存 优先于 一级缓存

# 6.9 注解方式整合 Mybatis [了解]
mybatis 的注解开发不是主流形式,只能开发最简的增删改查,复杂一些的一对一,一对多,就很难阅读
# 6.9.1 Mapper 接口
/** | |
* 将 dao 接口加入到 spring 容器两种方式 | |
* 1. 在 dao 接口上加入 @Mapper 注解 | |
* 2. 在启动类上加入 @MapperScan ("com.qfedu.dao") 注解 | |
*/ | |
@Mapper // 将 mybatis 生成 dao 接口的实现类加入容器中 | |
public interface StudentDao { | |
int deleteStudentById(int id); | |
Student findStudentById(int id); | |
} |
# 6.9.2 添加 Mybatis 注解
针对增删改查:@Insert,@Delete,@Update,@Select
还是需要在启动类中添加 @MapperScan 注解
package com.qfedu.dao;

import com.qfedu.entity.Student;
import org.apache.ibatis.annotations.*;

import java.util.List;

/**
 * mybatis  基于注解的开发
 *  @Insert,@Delete,@Update,@Select
 */
@CacheNamespace // 注解开启二级缓存
public interface StudentDao2 {


    @Select(value = "  SELECT id,name,age,sex,height,birthday,student_info from student_tb ")
    List<Student> findAllStudent();


    /**
     * 根据id 查询
     * @param id
     * @return
     */
    @Select(" SELECT id,name,age,sex,height,birthday ,student_info from student_tb where id = #{id}")
    Student findStudentById(int id);


    /**
     * 插入学生
     * @param student
     * @return
     */
    @Insert(value = "INSERT INTO  student_tb (name,age,sex,height,birthday) VALUES (#{name},#{age},#{sex},#{height},#{birthday} )")
    int addStudent(Student student);


    /**
     * 更新学生
     * @param student
     * @return
     */
    @Update("UPDATE student_tb set name = #{name} ,age = #{age},sex=#{sex},height = #{height} ,birthday = #{birthday} WHERE id = #{id}")
    int updateStudentById(Student student);

    /**
     * 根据id 删除
     * @param id
     * @return
     */
    @Delete(" delete from student_tb WHERE id = #{id}")
    int deleteStudentById(int id);


}
测试
    @Autowired
    private StudentDao2 studentDao2;
    /**
     * mybatis 基于注解开发
     */
    @Test
    public void  annotationTest(){

        List<Student> allStudent = studentDao2.findAllStudent();
        System.out.println("allStudent = " + allStudent);


        Student student = studentDao2.findStudentById(10);
        System.out.println("student = " + student);


        Student student2 = new Student();

        student2.setName("蓝猫");
        student2.setSex("M");
        student2.setHeight(180);
        student2.setBirthday(new Date());
        student2.setAge(1);

        // 增加
        int num2 = studentDao2.addStudent(student2);
        System.out.println("num2 = " + num2);

        // 删除
        int num3 = studentDao2.deleteStudentById(10);
        System.out.println("num3 = " + num3);


    }
# 6.10pagehelper 使用
select * from student_tb limit (pageIndex-1)*pageSize,pageSize
1. 引入依赖
        <!--pagehelper-->
        <dependency>
            <groupId>com.github.pagehelper</groupId>
            <artifactId>pagehelper-spring-boot-starter</artifactId>
            <version>1.2.9</version>
        </dependency>
2. 配置
#pagehelper配置
pagehelper.helper-dialect=mysql
pagehelper.page-size-zero=true
3. 使用 pagehelper
StudentService
    /**
     * 分页查询
     * @param pageIndex
     * @param pageSize
     * @return
     */
    List<Student> getAllStudentByPage(int pageIndex, int pageSize);
对应实现 StudentServiceImpl
@Override
    public List<Student> getAllStudentByPage(int pageIndex, int pageSize) {

        // 使用分页 本质就是在后续查询语句之后 追加  limit (pageIndex-1)*pageSize,pageSize
        PageHelper.startPage(pageIndex,pageSize);

        // 执行sql    SELECT id,name,age,sex,height,birthday,student_info as studentInfo from student_tb  limit (pageIndex-1)*pageSize,pageSize
        // 查询所有 就会自动配置分页  limit (pageIndex-1)*pageSize,pageSize
        List<Student> allStudent = studentDao.findAllStudent();


        // pageInfo 封装所有的分页信息
        // 获取总页数 总行数
        PageInfo<Student> pageInfo = new PageInfo<>(allStudent);

        System.out.println("总行数 pageInfo.getTotal() = " + pageInfo.getTotal());
        System.out.println("总页数 pageInfo.getPages() = " + pageInfo.getPages());
        System.out.println("每页数量 pageInfo.ge = " + pageInfo.getSize());


        return allStudent;
    }
处理器方法
    /**
     * url  /getAllStudentByPage?pageIndex=1&pageSize=10
     * @param pageIndex
     * @param pageSize
     * @return
     */
    @RequestMapping("/getAllStudentByPage")
    @ResponseBody
    public List<Student> getAllStudentByPage(int pageIndex,int pageSize){


        // 分页查询
        List<Student> allStudentByPage = studentService.getAllStudentByPage(pageIndex, pageSize);

        return allStudentByPage;

    }
练习:按照性别 姓名模糊查询 分页实现
# 七、jQuery AJAX
# 7.1 jQuery AJAX 简介
AJAX = 异步 JavaScript 和 XML(Asynchronous JavaScript and XML)。
简短地说,在不重载整个网页的情况下,AJAX 通过后台加载数据,并在网页上进行显示。
使用 AJAX 的应用程序案例:谷歌地图、腾讯微博、优酷视频、人人网等等。

# 实战
1. 修改 login 处理方法 返回 json 数据
package com.qfedu.controller;


import com.qfedu.entity.Admin;
import com.qfedu.entity.R;
import com.qfedu.service.AdminService;
import org.apache.catalina.User;
import org.springframework.beans.factory.annotation.Autowired;
import org.springframework.stereotype.Controller;
import org.springframework.web.bind.annotation.RequestMapping;
import org.springframework.web.bind.annotation.ResponseBody;

import javax.servlet.http.HttpServletResponse;
import java.io.IOException;
import java.io.PrintWriter;

/**
 * admin 管理员用户相关
 */
@Controller
public class AdminController {

    @Autowired
    private AdminService adminService;

    /**
     * url  /login?username=liu&password=123456
     * 登录
     */
    @RequestMapping("/login")
    @ResponseBody
    public R<Admin> login(String username, String password) {


        System.out.println("username = " + username);
        System.out.println("password = " + password);

        Admin admin = adminService.login(username, password);

        R<Admin> r = new R<>();
        if (admin!=null){ // 登录成功

            r.setCode(1);
            r.setMsg("success");
            r.setData(admin);
        }else {
            r.setCode(0);
            r.setMsg("用户名 或者 密码错误");
        }

        return r;
    }


}

2. 修改前端登录界面
在 static 目录导入 jquery

login.html 使用 get 发起 ajax 请求
<!DOCTYPE html>
<html lang="en">
<head>
    <meta charset="UTF-8">
    <title>Title</title>
    <!-- 引入jquery-->
    <script src="js/jquery-3.4.1.min.js"></script>
</head>
<body>
<h1>登录</h1>
<!--

-->
<form  enctype="application/x-www-form-urlencoded">
    <!--  name="username"表单提交时 username 就是key value就是input的输入值-->
    username:<input type="text" name="username" id="username"><br>
    password:<input type="password" name="password" id="password"><br>
    <input type="button" value="登录"  onclick="login()">
</form>

<div id="msg"></div>

<!-- js 代码块-->
<script type="text/javascript">

    function login(){

        // 获取input 输入框的值
        var username = $("#username").val();
        var password = $("#password").val();

        //打印
        console.log("username:"+username+"---password:"+password);

        // $.get 通过jquery 发起get 请求
        //  "/login" 请求的地址 url
        //   {username:username,password:password} 提交的数据 js对象,后端接收的就是键值对
        //   function (data) {   } 请求响应成功的回调函数  response就是处理器方法返回的json数据-->js对象
        //   "json"  将后端处理方法返回的json 直接转化js 对象
        $.get("/login",{username:username,password:password},function (response) {// 处理服务正常返回的数据
            alert("服务端正常数据");
            // response  == 响应的R对象
            alert("响应的数据:"+JSON.stringify(response))

            //得到后端响应数据

            if (response.code == 1){
                // 1.将数据异步展示到当前界面
                // var admin = response.data;
                // $("#msg").html("欢迎"+admin.username+"登录");

                // 2.跳转欢迎页
                window.location.href="/welcome.html";
            }else {
                alert("登录失败")
            }


        },"json").fail(function () {
            alert("服务端错误");
        });

    }


</script>


</body>
</html>

3. 测试


# 7.2 get 和 post 方法
get 方式
  // $.get 通过jquery 发起get 请求
        //  "/login" 请求的地址 url
        //   {username:username,password:password} 提交的数据 js对象,后端接收的就是键值对
        //   function (data) {   } 请求响应成功的回调函数  response就是处理器方法返回的json数据-->js对象
        //   "json"  将后端处理方法返回的json 直接转化js 对象
        $.get("/login",{username:username,password:password},function (response) {// 处理服务正常返回的数据
            alert("服务端正常数据");
            // response  == 响应的R对象
            alert("响应的数据:"+JSON.stringify(response))

            //得到后端响应数据

            if (response.code == 1){
                // 1.将数据异步展示到当前界面
                // var admin = response.data;
                // $("#msg").html("欢迎"+admin.username+"登录");

                // 2.跳转欢迎页
                window.location.href="/welcome.html";
            }else {
                alert("登录失败")
            }
        },"json").fail(function () {
            alert("服务端错误");
        });
post
        // post请求方式   和get请求方式没有区别
        $.post("/login",{username:username,password:password},function (response) {// 处理服务正常返回的数据
            alert("服务端正常数据");
            // response  == 响应的R对象
            alert("响应的数据:"+JSON.stringify(response))

            //得到后端响应数据

            if (response.code == 1){
                // 1.将数据异步展示到当前界面
                // var admin = response.data;
                // $("#msg").html("欢迎"+admin.username+"登录");

                // 2.跳转欢迎页
                window.location.href="/welcome.html";
            }else {
                alert("登录失败")
            }
        },"json").fail(function () {
            alert("服务端错误");
        });
综合方式 $.ajax
 // 综合请求方式  可以get 也可以 post
        $.ajax({
            url:"/login",
            type:"get",  // 请求方式 get  post
            // data:{username:username,password:password}, // 提交的数据
            data:$("#form1").serialize(),// $("#form1").serialize() 获取表单中所有input的数据值 == username=liu&passwrod=123456
            success:function (response) {  //服务器成功返回的数据
                    alert("服务端正常数据");
                    // response  == 响应的R对象
                    alert("响应的数据:"+JSON.stringify(response))

                    //得到后端响应数据

                    if (response.code == 1){
                        // 1.将数据异步展示到当前界面
                        // var admin = response.data;
                        // $("#msg").html("欢迎"+admin.username+"登录");

                        // 2.跳转欢迎页
                        window.location.href="/welcome.html";
                    }else {
                        alert("登录失败")
                    }
            },
            error:function (data) {// 服务器返回失败的数据
                alert(data);
            },
            //ajax 会将服务器返回的json字符串-----》js对象
            dataType:"json"
        });

# 八、SpringBoot 常用配置【 重点 】
# 8.1 SpringBoot 的配置文件格式
SpringBoot 的配置文件 (常用两种)
- application.properties
- application.yaml /application.yml
SpringBoot 的配置文件,
文件名必须是application, 格式支持properties和yml。
application.yaml 语法
   1. yml文件,会根据换行和缩进帮助咱们管理配置文件所在位置

  2. yml文件,相比properties更轻量级一些

  3. K: V 表示一对键值对(冒号: 后一定有一个空格)

  4. 以空格的缩进来控制层级关系;只要是左对齐的都是属于一个层级的数据

  5. 属性和值大小写敏感.
application.properties
server.port=8080
application.yaml
原来的 application.properties . 语法使用 : + 换行 替代, key 和 value 之间使用:空格 进行分割
server:
	port: 8080
示例 application.yaml
# 如果application.properties  和 application.yaml 都配置了同一属性,
#  application.properties中属性优先级高
server:
  port: 8090


spring:
  datasource:
    url: jdbc:mysql://localhost:3306/java2310_1?serverTimezone=Asia/Shanghai&useSSL=false
    username: root
    password: 123456
    type: com.alibaba.druid.pool.DruidDataSource
    druid:
      initial-size: 5
      max-active: 10
      min-idle: 3
# 注意:
1. 如果 application.properties 和 application.yaml 都配置了同一属性,application.properties 中属性优先级高
2.application.yaml key 和 value 之间 必有 :
# 8.2 多环境配置
实际开发中,有三种环境:
1. 开发环境 - 程序员日常开发所需 dev
2. 测试环境 - 项目的集成测试 test
3. 生产环境 - 最终项目部署的环境,真实环境 pro
SpringBoot 支持多环境的配置。只需要根据环境需要,编写多个配置文件,通过配置属性选择使用哪个环境
使用步骤:
1. 多环境的配置文件命名:application - 环境名.yml application - 环境名.properties
application-dev.yaml application-dev.properties 开发环境
application-test.yaml application-test.properties 测试环境
application-prod.yaml application-prod.properties 生产环境
2. 在总文件 application.yml 中通过属性:spring.profiles.active 环境名

# 在默认配置文件激活多环境配置
#  dev 激活开发环境配置
#  test 激活测试环境配置
#   prod 激活生产环境配置
spring.profiles.active=prod

# 8.3 获取配置文件信息
场景: ....
解释:将 yml 配置的值,赋值给对应的类
方案:
方案一: @ConfigurationProperties 批量读取配置文件的内容
方案二: @Value 单个读取配置文件
1. 在默认文件配置
application.properties 配置
aliyun.accessKey=ATYSBD23B1N44
aliyun.accessSecret=123456
application.yaml 配置
# 阿里云的 key 和 秘钥
aliyun:
  accessKey: ATYSBD23B1N44
  accessSecret: 123456
2. 创建一个实体类 封装阿里云相关参数
方式一批量读取
package com.qfedu.entity;


import lombok.Data;
import org.springframework.beans.factory.annotation.Value;
import org.springframework.boot.context.properties.ConfigurationProperties;
import org.springframework.stereotype.Component;

import java.io.Serializable;

/**
 * 加入到容器中的bean 初始化属性的两种方式
 *    1.批量初始化
 *          @ConfigurationProperties(prefix = "aliyun")
 *          作用:批量读取配置文件中以 aliyun开头的属性,配置到对应创建bean的属性中
 *
 *    2. 单个读取属性
 */
@ConfigurationProperties(prefix = "aliyun")
@Component // 创建一个该类型的bean 加入到容器
@Data
public class AliYunProperties  implements Serializable {


    private String accessKey;

    private String accessSecret;

}
方式二 单个读取配置文件的值
package com.qfedu.entity;


import lombok.Data;
import org.springframework.beans.factory.annotation.Value;
import org.springframework.boot.context.properties.ConfigurationProperties;
import org.springframework.stereotype.Component;

import java.io.Serializable;

/**
 * 加入到容器中的bean 初始化属性的两种方式
 *    1.批量初始化
 *          @ConfigurationProperties(prefix = "aliyun")
 *          作用:批量读取配置文件中以 aliyun开头的属性,配置到对应创建bean的属性中
 *
 *    2. 单个读取属性
 */
//@ConfigurationProperties(prefix = "aliyun")
@Component // 创建一个该类型的bean 加入到容器
@Data
public class AliYunProperties  implements Serializable {


    // 访问阿里云的key
    @Value(value = "${aliyun.accessKey}") // 单个读取配置文件aliyun.accessKey对应值赋值给当前属性 accessKey
    private String accessKey;

    // 访问阿里云 秘钥
    @Value("${aliyun.accessSecret}")
    private String accessSecret;

}
3. 测试
    @Autowired
    private AliYunProperties aliYunProperties;

    /**
     * 通过阿里云配置类 读取配置文件的属性
     * @return
     */
    @RequestMapping("/getAliYunProperties")
    @ResponseBody
    public R<AliYunProperties> getAliYunProperties(){

          R<AliYunProperties> r = new R<>();

          r.setCode(1);
          r.setMsg("success");
          r.setData(aliYunProperties);

          return r;
    }

# 8.4 其他注解
# 生成 Bean 注解
@Controler @Service @Respository @Component
/**
 * @Controller 生成bean 加入到容器 ,默认名字(类名首字母小写 testController)
 * @Controller(value = "testBean")  加入容器指定名字(id)testBean
 *
 *   凡是加入到容器中的Bean 都存在ConcurrentHashMap 中 key 就是bean名字(id)
 *                                                 value 就是容器创建对象的引用地址
 *
 */
@Controller(value = "testBean")
public class TestController {

}
@Bean 也可以生成注解 ,但是必须配合 @Configuration 使用
package com.qfedu.config;

import com.qfedu.entity.User;
import org.springframework.context.annotation.Bean;
import org.springframework.context.annotation.Configuration;

/**
 * 创建一个配置类
 *  1使用@Bean标记在方法生 创建 明bean
 *  2.可以维护bean之间的依赖关系(后边会遇到)
 */
@Configuration
public class MyConfig {

    /**
     *  @Bean 就是给了我们一个后门,可以根据程序员的业务逻辑定制bean,最终由容器调用此方法创建 持有bean
     *
     *  @Bean 默认的名字(id)为 方法名getUser1
     *
     *   @Bean(value = "user1") 创建一个bean 名字(id)就是user1,可以通过名字获取bean
     *
     * @return
     */
    @Bean(value = "user1") // 表示容器启动时,会调用此方法得到一个bean,并且加入到容器
    public User getUser1(){
        User user = new User();

        user.setId(100);
        user.setUsername("xiaoming");
        user.setPassword("123456");

        return user;
    }


}
从容器中获取 bean
   @Autowired
    private User user;

    @RequestMapping("/getUser")
    @ResponseBody
    public User getUser(){

        System.out.println("获取user");

        return user;
    }
测试

# 如何识别多个同类型的 Bean @Qualifier
1. 容器中放入多个 User
package com.qfedu.config;

import com.qfedu.entity.User;
import org.springframework.context.annotation.Bean;
import org.springframework.context.annotation.Configuration;

/**
 * 创建一个配置类
 *  1使用@Bean标记在方法生 创建 明bean
 *  2.可以维护bean之间的依赖关系(后边会遇到)
 */
@Configuration
public class MyConfig {

    /**
     *  @Bean 就是给了我们一个后门,可以根据程序员的业务逻辑定制bean,最终由容器调用此方法创建 持有bean
     *
     *  @Bean 默认的名字(id)为 方法名getUser1
     *
     *   @Bean(value = "user1") 创建一个bean 名字(id)就是user1,可以通过名字获取bean
     *
     * @return
     */
    @Bean(value = "user1") // 表示容器启动时,会调用此方法得到一个bean,并且加入到容器
    public User getUser1(){
        User user = new User();

        user.setId(100);
        user.setUsername("xiaoming");
        user.setPassword("123456");

        return user;
    }


    @Bean(value = "user2") // 表示容器启动时,会调用此方法得到一个bean,并且加入到容器
    public User getUser2(){
        User user = new User();

        user.setId(100);
        user.setUsername("xiaoming");
        user.setPassword("123456");

        return user;
    }


}

2. 从容器中获取 Bean
    /**
     *  @Autowired 从容器中获取同类型的Bean 注入进来
     *      查找类型的逻辑:
     *              1.根据类型从容器中获取bean,找到一个bean,直接注入
     *                                      找到多个bean,无法区分
     *                           2.如果无法区分,就会将属性名作为名字(id)从容器找到对应的 bean ,如果找到 则注入
     *                                      3.如果找不到 ,就要使用注解   @Qualifier(value = "user1")
     *                                              明示当前属性需要从容器中获取那个bean
     *
     */
    @Autowired
    @Qualifier(value = "user1")
    private User user;

    @RequestMapping("/getUser")
    @ResponseBody
    public User getUser(){

        System.out.println("获取user");

        return user;
    }
# @RestController
@RestController 也是标记在类上,等价于 @ResponsBody +@Controller
仅适用于:当前控制类下所有的处理器方法 都返回 json 数据

package com.qfedu.controller;


import com.qfedu.entity.R;
import com.qfedu.entity.Student;
import com.qfedu.service.StudentService;
import org.springframework.beans.factory.annotation.Autowired;
import org.springframework.stereotype.Controller;
import org.springframework.web.bind.annotation.RequestMapping;
import org.springframework.web.bind.annotation.ResponseBody;
import org.springframework.web.bind.annotation.RestController;

import java.util.List;

/**
 * @RestController 本质 == @Controller + @ResponseBody
 *          作用:1.加入到容器,生成Bean
 *               2.配置当前控制类下所有的处理器方法 都返回对象转json  处理器方法可以省略  @ResponseBody
 */
@RestController
//@Controller
public class StudentController {


    @Autowired
    private StudentService studentService;

    /**
     * 根据id查询
     * @param id
     * @return
     */
    @RequestMapping("/findStudentById")
//    @ResponseBody
    public R<Student> findStudentById(int id){

        Student student = studentService.findStudentById(id);

        R<Student> r = new R<>();

        r.setCode(1);
        r.setMsg("success");
        r.setData(student);

        return r;
    }


    /**
     * 查询所有学生
     * @return
     */
    @RequestMapping("/findAllStudent")
//    @ResponseBody
    public R<List<Student>> findAllStudent(){

        List<Student> allStudent = studentService.findAllStudent();

        R<List<Student>> r = new R<>();

        r.setCode(1);
        r.setMsg("success");
        r.setData(allStudent);

        return r;
    }


}
# 8.5debug

# 通过控制台报错分析


结合错误原因 和 定位自己代表报错位置

# 使用断点调试 完成 debug
# 1. 前端 debug


# 2. 后端 idea debug


# 3. 如果 前后 debug 无法明确问题 ?
直接使用浏览器 或者 postman 发起请求,单独测试接口 ,确认是否后台接口报错 (缩小 bug 错误范围 )


# 4. 以上办法都不行?
回到解放前:可以运行实例代码,或者将实例代码拷贝过来 对比测试
# 8.6 文件上传(会用既可)
图片 / 文件上传
上传 tomcat 服务器 / 上传本地磁盘
1. 引入文件上传依赖
    <!-- 使用工具类 -->
		<dependency>
            <groupId>commons-fileupload</groupId>
            <artifactId>commons-fileupload</artifactId>
            <version>1.3.2</version>
        </dependency>
        <dependency>
            <groupId>commons-io</groupId>
            <artifactId>commons-io</artifactId>
            <version>2.4</version>
        </dependency>
2. 在 static 创建 file.html 使用 form 表单提交文件
<!--
    上传文件只可以是post 方式

    上传文件配置格式 enctype="multipart/form-data" 将文件以二级制流传输
-->
<form action="/uploadImg" method="post" enctype="multipart/form-data">
    图片:<input type="file" name="img"><br>
    <input type="submit" value="上传">
</form>
3. 接收提交的文件
package com.qfedu.controller;

import com.qfedu.entity.R;
import org.apache.commons.io.FileUtils;
import org.springframework.stereotype.Controller;
import org.springframework.web.bind.annotation.RequestMapping;
import org.springframework.web.multipart.MultipartFile;

import javax.servlet.http.HttpServletRequest;
import java.io.File;
import java.io.IOException;
import java.util.Random;
import java.util.UUID;

/**
 * 文件相关controler
 */
@Controller
public class FileConTroller {


    /**
     * 用于接收图片文件   MultipartFile img 对应form表单提交的name
     *                   图片:<input type="file" name="img"><br>
     *
     * @param img
     * @return
     */
    @RequestMapping("/uploadFile")
    public String uploadFile(MultipartFile img, HttpServletRequest request) throws IOException {

        //1.获取一个相对路径
        // tomcat 真正加载资源的路径
        String realPath = request.getServletContext().getRealPath("/upload");

        System.out.println("realPath = " + realPath);

        // 存储文件的父路径
        File file = new File(realPath);

        // 2.如果路径不存在则创建
        if (!file.exists()){
            file.mkdirs();
        }

        // 3.得到文件的原始名字
        String originalFilename = img.getOriginalFilename();

        // 4.对文件重命名  防止文件被覆盖
        String newFileName = UUID.randomUUID().toString() +"-"+originalFilename;
        System.out.println("newFileName = " + newFileName);

        // 5.将接收到的文件流写入到 到文件中
        //此时可以通过路径
        // http://localhost:8080/upload/132dcfd0-c1b2-495d-a506-eb19e03b00e2-8900.jpg
        FileUtils.writeByteArrayToFile(new File(file,newFileName),img.getBytes());

        //6.跳转界面
        return "redirect:/success.html";

    }


}


# 8.7 热加载(了解)
可以配置 idea 中代码,修改以后自动编译部署(必须在 debug 模式)
不建议搭建使用,因为有时候不生效
# 1. 导入依赖
<dependency> | |
<groupId>org.springframework.boot</groupId> | |
<artifactId>spring-boot-devtools</artifactId> | |
<optional>true</optional> | |
</dependency> |
# 2. 配置 settings 配置


# 3. 使用 以 debug 模式启动, 修改代码触发 热更新
    @RequestMapping("/test1")
    @ResponseBody
    public R<String>  test1(){


        R<String> r = new R<>();

        r.setCode(1);
        r.setMsg("success");

        System.out.println("test1-----123456");

        return r;
    }
# 九、SpringBoot 整合日志框架
什么是日志?为什么需要日志?
sout  输出到控制台的文本信息 就是一种日志(log)
其实日志,不但可以输出到控制台,还可以写入到文件中


日志的作用:
1.在控制台打印,可以快速的查看程序运行到哪里 记录业务逻辑,帮助我们调试
2.日志记录到为文件 可以快速的帮助我们解决生产环境中遇到的问题 bug  所有的异常也会写入日志

3.还可以通过日志 进行统计分析, 统计哪些接口并发量较大 ,哪些接口响应慢  此时可以针对性的优化
            通过 elk  完成日志 分析
# 8.0 日志
作用:
- 方便调试
- 记录运行信息
- 记录异常信息
现在如何实现记录日志的呢
- sout 这个输出语句
弊端
- 无论什么情况,只要只要到此处输出语句一定执行
- 只能输出控制台
- 信息不完整
- 因为 sout 是加锁的,性能非常低
# 8.1 日志框架
slf4j
slf4j 只是一个日志标准,并不是日志系统的具体实现。它用于提供日志操作的接口,提供获取日志对象的方法
log4j
apache 实现的一个开源日志组件
logback
相对于 logback,有更好的特性,
springboot默认使用logbacklog4j2
是 log4j的升级版本,拥有更好的性能,支持异步日志注意:slf4j 属于日志接口,log4j、logback、log4j2 属于日志实现
springboot 默认使用 logcak 处理日志,但是通过使用通过 slf4j 调用的
# 8.2 日志的等级
日志级别按照从低到高为:
ALL < TRACE <
DEBUG < INFO < WARN < ERROR< FATAL < OFF程序会打印高于或等于所设置级别的日志,设置的 **
日志等级越高,打印出来的日志就越少**All:最低等级,会输出所有日志记录
Trace:追踪,就是程序推进一下
Debug:调试日志
Info:消息日志,可用于输出应用程序的运行过程
Warn:输出警告级别的日志
Error:输出错误信息日志
Fatal:输出每个严重的错误日志.
OFF:最高等级的,用于关闭所有日志记录
DEBUG:在开发阶段,帮助我们调试程序,而生产环境不需要记录日志 常见的就是配置 mybatis 的日志级别为 debug
Info: 都是必要记录的日志
# 8.3springboot 使用日志
# 1. 配置文件配置日志
# 配置当前工程的日志默认级别info
logging.level.root=info

#配置所有service层日志界别debug
logging.level.com.qfedu.service=debug

#显示mybatis 日志 可以查看mybatis 的日志
logging.level.com.qfedu.dao=debug

#配置日志记录的文件名字
logging.file=my.log
# 2. 使用日志
package com.qfedu.controller;


import com.qfedu.entity.AliYunProperties;
import com.qfedu.entity.R;
import com.qfedu.entity.User;
import lombok.extern.slf4j.Slf4j;
import org.slf4j.Logger;
import org.slf4j.LoggerFactory;
import org.springframework.beans.factory.annotation.Autowired;
import org.springframework.beans.factory.annotation.Qualifier;
import org.springframework.stereotype.Controller;
import org.springframework.web.bind.annotation.RequestMapping;
import org.springframework.web.bind.annotation.ResponseBody;

import java.util.concurrent.ConcurrentHashMap;

/**
 * @Controller 生成bean 加入到容器 ,默认名字(类名首字母小写 testController)
 * @Controller(value = "testBean")  加入容器指定名字(id)testBean
 *
 *   凡是加入到容器中的Bean 都存在ConcurrentHashMap 中 key 就是bean名字(id)
 *                                                 value 就是容器创建对象的引用地址
 *
 */
@Slf4j // 作用就是在当前类中注入属性Logger log,
        // 相当于Logger log  = LoggerFactory.getLogger(TestController.class);
@Controller(value = "testBean")
public class TestController {

    // 得到一个日志 对象,可以将日志输出到控制台,并写入到日志文件
//   private Logger log  = LoggerFactory.getLogger(TestController.class);

    @RequestMapping("/test1")
    @ResponseBody
    public R<String>  test1(){


        R<String> r = new R<>();

        r.setCode(1);
        r.setMsg("success");

//        System.out.println("test1-----123456");

        log.debug("test1-----debug");
        log.info("test1-----info");
        log.warn("test1-----warn");

        return r;
    }

    @Autowired
    private AliYunProperties aliYunProperties;

    /**
     * 通过阿里云配置类 读取配置文件的属性
     * @return
     */
    @RequestMapping("/getAliYunProperties")
    @ResponseBody
    public R<AliYunProperties> getAliYunProperties(){

          R<AliYunProperties> r = new R<>();

          r.setCode(1);
          r.setMsg("success");
          r.setData(aliYunProperties);

          return r;
    }

    /**
     *  @Autowired 从容器中获取同类型的Bean 注入进来
     *      查找类型的逻辑:
     *              1.根据类型从容器中获取bean,找到一个bean,直接注入
     *                                      找到多个bean,无法区分
     *                           2.如果无法区分,就会将属性名作为名字(id)从容器找到对应的 bean ,如果找到 则注入
     *                                      3.如果找不到 ,就要使用注解   @Qualifier(value = "user1")
     *                                              明示当前属性需要从容器中获取那个bean
     *
     */
    @Autowired
    @Qualifier(value = "user1") // 将user1 作为名字去容器中找对应的Bean
    private User user;

    @RequestMapping("/getUser")
    @ResponseBody
    public User getUser(){

        System.out.println("获取user");

        return user;
    }

}


# 3. 创建日志切面

# 实战
1. 引入 aop 依赖
       <!-- 导入aop相关 依赖-->
        <dependency>
            <groupId>org.springframework.boot</groupId>
            <artifactId>spring-boot-starter-aop</artifactId>
        </dependency>
2. 创建切面
package com.qfedu.aspect;


import lombok.extern.slf4j.Slf4j;
import org.aspectj.lang.ProceedingJoinPoint;
import org.aspectj.lang.annotation.Around;
import org.aspectj.lang.annotation.Aspect;
import org.aspectj.lang.annotation.Pointcut;
import org.springframework.stereotype.Component;
import org.springframework.web.context.request.RequestAttributes;
import org.springframework.web.context.request.RequestContextHolder;
import org.springframework.web.context.request.ServletRequestAttributes;
import org.springframework.web.servlet.mvc.condition.RequestConditionHolder;

import javax.servlet.http.HttpServletRequest;
import java.util.Map;

@Slf4j
@Component
@Aspect
public class LogAspect {

    /**
     * 切点表达式
     * public  R com.qfedu.controller.TestController.test1()
     *
     *   * com.qfedu.controller.*.*(..)
     */
    @Pointcut(value = "execution( * com.qfedu.controller.*.*(..))")
    public void pointCut(){

    }


    /**
     * 环绕通知
     * @param proceedingJoinPoint
     * @return
     */
    @Around(value = "pointCut()")
    public Object around(ProceedingJoinPoint proceedingJoinPoint) throws Throwable {

        // 获取请求的方法
        String methodName = proceedingJoinPoint.getSignature().getName();

        // 获取到当前请求的 的Request
        // 客户端每次请求对应的url tomcat都会为本次请求创建一个线程,处理对应请求 并相应
        //                       开辟一个线程调用对应的处理器方法、
        //                       RequestContextHolder.getRequestAttributes() 获取当前请求线程中的request
        ServletRequestAttributes requestAttributes = (ServletRequestAttributes) RequestContextHolder.getRequestAttributes();
        HttpServletRequest request = requestAttributes.getRequest();


        // 获取到该请求参数
        Map<String, String[]> parameterMap = request.getParameterMap();

        StringBuilder params = new StringBuilder();
        for (String key : parameterMap.keySet()) {
            params.append(key);
            params.append("=");
            params.append(request.getParameter(key));
            params.append("&");
        }

        // 获取对应的url
        String url = request.getRequestURL().toString();


        long startTime  = System.currentTimeMillis();
        // 调用目标方法执行
        Object result = proceedingJoinPoint.proceed();


        long cost = System.currentTimeMillis() -startTime;

        log.info("请求方法:"+methodName +"--请求url:"+url + "--请求参数:"+params+"--耗时:"+cost);

        return result;

    }

}
3 测试


09:30---10:00 日志框架,日志级别
0906
09:40-10:00 配置文件 application.properties application.yaml
https://rflive.videocc.net/970235d61a16884335252835925/recordfe-970235d61a16884335252835925-1693964922164.mp4
11:07---11:44 多环境配置 ,读取配置文件属性
https://rflive.videocc.net/970235d61a16884335252835925/recordfe-970235d61a16884335252835925-1693969612647.mp4
14:20-15:00 @Bean @Qualifier 注解
https://rflive.videocc.net/970235d61a16884335252835925/recordfe-970235d61a16884335252835925-1693982132462.mp4
15:30---15:50 @RestController
https://rflive.videocc.net/970235d61a16884335252835925/recordfe-970235d61a16884335252835925-1693985616359.mp4
16:04 ----16:46 debug 断点调试
https://rflive.videocc.net/970235d61a16884335252835925/recordfe-970235d61a16884335252835925-1693987642031.mp4
17:10---17:50 文件上传 热更新
https://rflive.videocc.net/970235d61a16884335252835925/recordfe-970235d61a16884335252835925-1693991700185.mp4
作业:
1. 练习今日内容
2. 将上周四 --- 今日所有 springboot mybatis 相关内容 整理总结(写一个 md)
0905
09:45--10:10 一级缓存
https://rflive.videocc.net/970235d61a16884335252835925/recordfe-970235d61a16884335252835925-1693878344379.mp4
10:48--11: 30 mybatis 二级缓存
https://rflive.videocc.net/970235d61a16884335252835925/recordfe-970235d61a16884335252835925-1693884469858.mp4
14:36---15:00 分页
https://rflive.videocc.net/970235d61a16884335252835925/recordfe-970235d61a16884335252835925-1693895758027.mp4
15:41--- 16:59 登录示例 ajax
https://rflive.videocc.net/970235d61a16884335252835925/recordfe-970235d61a16884335252835925-1693899724364.mp4
17:30-17:50 ajax get post put 请求
https://rflive.videocc.net/970235d61a16884335252835925/recordfe-970235d61a16884335252835925-1693906921729.mp4
作业:
1. 将今日内容敲两边
2. 完成 一个学生对应 多个角色的一对多
3. 完成依赖两张表的 一对一 一对多
用户 ---> 订单 (1 VS N)     一个用户有多个订单
订单  ---> 用户 (1 VS 1)    一个订单只会属于一个人
4. 复习 js jquery css html
今日作业:
1. 将今日内容敲两边
2. 完成 一个学生对应 多个角色的一对多
3. 完成依赖两张表的 一对一 一对多
用户 ---> 订单 (1 VS N)     一个用户有多个订单
订单  ---> 用户 (1 VS 1)    一个订单只会属于一个人
tb_user表
```sql
CREATE TABLE `tb_user` (
`id` int(11) NOT NULL AUTO_INCREMENT COMMENT '用户编号',
`username` varchar(10) DEFAULT NULL COMMENT '用户名',
`password` varchar(10) DEFAULT NULL COMMENT '密码',
`phone` varchar(11) DEFAULT NULL COMMENT '手机号',
`create_time` date DEFAULT NULL COMMENT '注册时间',
`money` double(10,2) DEFAULT NULL COMMENT '账户余额'
PRIMARY KEY (`id`)
) ENGINE=InnoDB AUTO_INCREMENT=34 DEFAULT CHARSET=utf8;
```
tb_order表
```sql
CREATE TABLE `tb_order` (
`oid` int(11) NOT NULL AUTO_INCREMENT COMMENT '订单编号',
`order_time` datetime DEFAULT NULL COMMENT '订单时间',
`order_desc` varchar(255) DEFAULT NULL COMMENT '订单详情',
`uid` int(11) DEFAULT NULL COMMENT '关联用户id',
PRIMARY KEY (`oid`)
) ENGINE=InnoDB AUTO_INCREMENT=4 DEFAULT CHARSET=utf8;
INSERT INTO `tb_order` VALUES (1, '2022-11-17 15:06:29', '笔记本电脑', 1);
INSERT INTO `tb_order` VALUES (2, '2022-12-16 11:00:41', 'Cherry键盘', 1);
INSERT INTO `tb_order` VALUES (3, '2022-12-16 11:01:23', 'Logi鼠标', 2);
```
4. 将今日所有内容 使用 controller service 展示到浏览器中
0904
10:40---11:05 一对一 一对多概念
https://rflive.videocc.net/970235d61a16884335252835925/recordfe-970235d61a16884335252835925-1693795143792.mp4
11:13-- 11:37 一对一
https://rflive.videocc.net/970235d61a16884335252835925/recordfe-970235d61a16884335252835925-1693797186693.mp4
14:18--- 14:44 一对多
https://rflive.videocc.net/970235d61a16884335252835925/recordfe-970235d61a16884335252835925-1693808324137.mp4
14:55-15:22 多对多
https://rflive.videocc.net/970235d61a16884335252835925/recordfe-970235d61a16884335252835925-1693810720033.mp4
16:00 ---16:45 动态 sql
https://rflive.videocc.net/970235d61a16884335252835925/recordfe-970235d61a16884335252835925-1693814399196.mp4
周末作业:
使用 springboot + mybatis 重写上周的作业 **(新建一个工程)**
1. 登录例子
2. 展示所有 admin
- 完成 admin 使用 form 表单更新
- 查询所有的学生表(仿照 admin 列表)
5. 以下查询使用表格展示
- 1.查询所有年龄大于18 并且 性别为M 的学生列表   使用 BaseDao实现

? 占位符 只能替换 对应列的值,不能替换列名,关键字

SELECT id,name,age,sex,height,birthday ,createtime FROM student_tb
    where  age >? and sex = ?;
- 2.查询所有成绩并包含学生信息

1.SELECT * FROM score_tb
		LEFT JOIN student_tb ON score_tb.student_id= student_tb.id ;


2.使用BaseDao  实现,返回 List<Map>
本周学的内容
springboot 替代了 Servlet
mybattis 替代了 BaseDao dbutils (jdbc )
0902
10:00--111 mybatis 增删改查
https://rflive.videocc.net/970235d61a16884335252835925/recordfe-970235d61a16884335252835925-1693621780574.mp4
14:30--15:20 mybatis 别名 映射结果集
https://rflive.videocc.net/970235d61a16884335252835925/recordfe-970235d61a16884335252835925-1693637123575.mp4
0901
09:39----10:10 session 界面跳转,回话
https://rflive.videocc.net/970235d61a16884335252835925/recordfe-970235d61a16884335252835925-1693532359024.mp4
10:47----11:17 json 数据格式
https://rflive.videocc.net/970235d61a16884335252835925/recordfe-970235d61a16884335252835925-1693536426605.mp4
11:25---11:55 响应 json 数据 @ResponseBody,接收 json 数据 @RequesBody
https://rflive.videocc.net/970235d61a16884335252835925/recordfe-970235d61a16884335252835925-1693538668128.mp4
14:31---14:40 拦截器
https://rflive.videocc.net/970235d61a16884335252835925/recordfe-970235d61a16884335252835925-1693549910523.mp4
15-30-15:52 全局异常处理
https://rflive.videocc.net/970235d61a16884335252835925/recordfe-970235d61a16884335252835925-1693553602027.mp4
16:00--17:00 mybatis 入门 例子
https://rflive.videocc.net/970235d61a16884335252835925/recordfe-970235d61a16884335252835925-1693555579078.mp4
作业
1. 将原有 demo 敲 2 遍
2. 写一个切面 切向 dao 层
3. 将周末 servlet + service + dao 改造为 springbot 写法 (20 分钟)
0831
10:37----aop 概念
https://rflive.videocc.net/970235d61a16884335252835925/recordfe-970235d61a16884335252835925-1693449439445.mp4
11:17---11:45 aop 实例
https://rflive.videocc.net/970235d61a16884335252835925/recordfe-970235d61a16884335252835925-1693451792161.mp4
14:26--- 15:00 Aop 的五种通知
https://rflive.videocc.net/970235d61a16884335252835925/recordfe-970235d61a16884335252835925-1693463208875.mp4
15:48--- 16:10 @PostMapping @GetMapping 请求方式
https://rflive.videocc.net/970235d61a16884335252835925/recordfe-970235d61a16884335252835925-1693468080500.mp4
16:30---16:50 接收基本类型参数, 使用对象处理基本类型参数
https://rflive.videocc.net/970235d61a16884335252835925/recordfe-970235d61a16884335252835925-1693470917491.mp4
17:32 接收基本类型参数, 使用 map 接收, 路径参数
https://rflive.videocc.net/970235d61a16884335252835925/recordfe-970235d61a16884335252835925-1693474336574.mp4
0830
09:40---10:35 本地分支合并冲突
https://rflive.videocc.net/970235d61a16884335252835925/recordfe-970235d61a16884335252835925-1693359933135.mp4
10:40---10:56 远程分支合并本地分支冲突
https://rflive.videocc.net/970235d61a16884335252835925/recordfe-970235d61a16884335252835925-1693363356884.mp4
11:10--12:00 提交远程代码冲突 代码协作
https://rflive.videocc.net/970235d61a16884335252835925/recordfe-970235d61a16884335252835925-1693364958587.mp4
14:20--15:00 idea git 工具
https://rflive.videocc.net/970235d61a16884335252835925/recordfe-970235d61a16884335252835925-1693377358279.mp4
15:44-----16:20 springboot 简介 demo
https://rflive.videocc.net/970235d61a16884335252835925/recordfe-970235d61a16884335252835925-1693381436006.mp4
16:36-----17:00 ioc demo
https://rflive.videocc.net/970235d61a16884335252835925/recordfe-970235d61a16884335252835925-1693381436006-20230830163654.mp4